
A finance employee needs to email a client’s Burgerservicenummer (the Dutch equivalent of a U.S. Social Security Number) to confirm a contract detail. They type it straight into the body of a normal email and hit send. Depending on how the tenant is configured, that email either gets encrypted and access-restricted automatically before it leaves the mailbox, or it goes out in plain text, readable by anyone who intercepts, forwards, or accidentally receives it.
This is exactly the gap Microsoft Purview Message Encryption, combined with Data Loss Prevention (DLP), is built to close. Rather than relying on a person remembering to manually encrypt a sensitive email, Microsoft Purview can detect the sensitive data itself and apply protection automatically, before the message ever reaches the recipient. In this post, I will walk through the full setup, the two protection options and the difference between them, and what actually happens on the recipient’s side, including a few things that went wrong along the way.
Table of Contents
- The Building Blocks
- Activating the Underlying Encryption Service
- Building the DLP Policy
- Testing the Detection
- What the Recipient Actually Sees
- It Still Shows Up as an Incident in Defender
- Conclusion
Disclaimer: This blog post is provided for informational purposes only. While every effort has been made to ensure accuracy, implementation of these features should be performed by qualified administrators in accordance with your organization’s security and change management policies. The author is not responsible for any issues, data loss, or security incidents that may occur from following this guidance. Always test in a non-production environment first and consult official Microsoft documentation before implementing security features in production.
The Building Blocks
Three Microsoft Purview components work together to make this happen:
- A DLP policy that scans outgoing email for a specific sensitive information type, in this case the built-in Netherlands Citizen’s Service (BSN) Number type, which validates both the digit pattern and its checksum.
- Message encryption, applied automatically once the DLP rule finds a match. Depending on the tenant, this dropdown can include several templates, including custom ones derived from existing sensitivity labels, but two options are always available: Encrypt protects the message, but the recipient can still forward, print, or copy it. Do Not Forward applies the same encryption plus blocks forwarding, printing, and copying. For this scenario, Do Not Forward is the better fit, since it does not require choosing between the two, Do Not Forward already includes the encryption.
- A custom branding template (optional), which controls what the encrypted message looks like and, with Microsoft 365 E5 or the E5 Compliance add-on, enables expiration and revocation of already-sent messages.
Activating the Underlying Encryption Service
Before any of this works, connect to Exchange Online PowerShell and check whether internal licensing is enabled:
Connect-ExchangeOnline -UserPrincipalName you@yourdomain.comGet-IRMConfiguration | Select-Object InternalLicensingEnabled
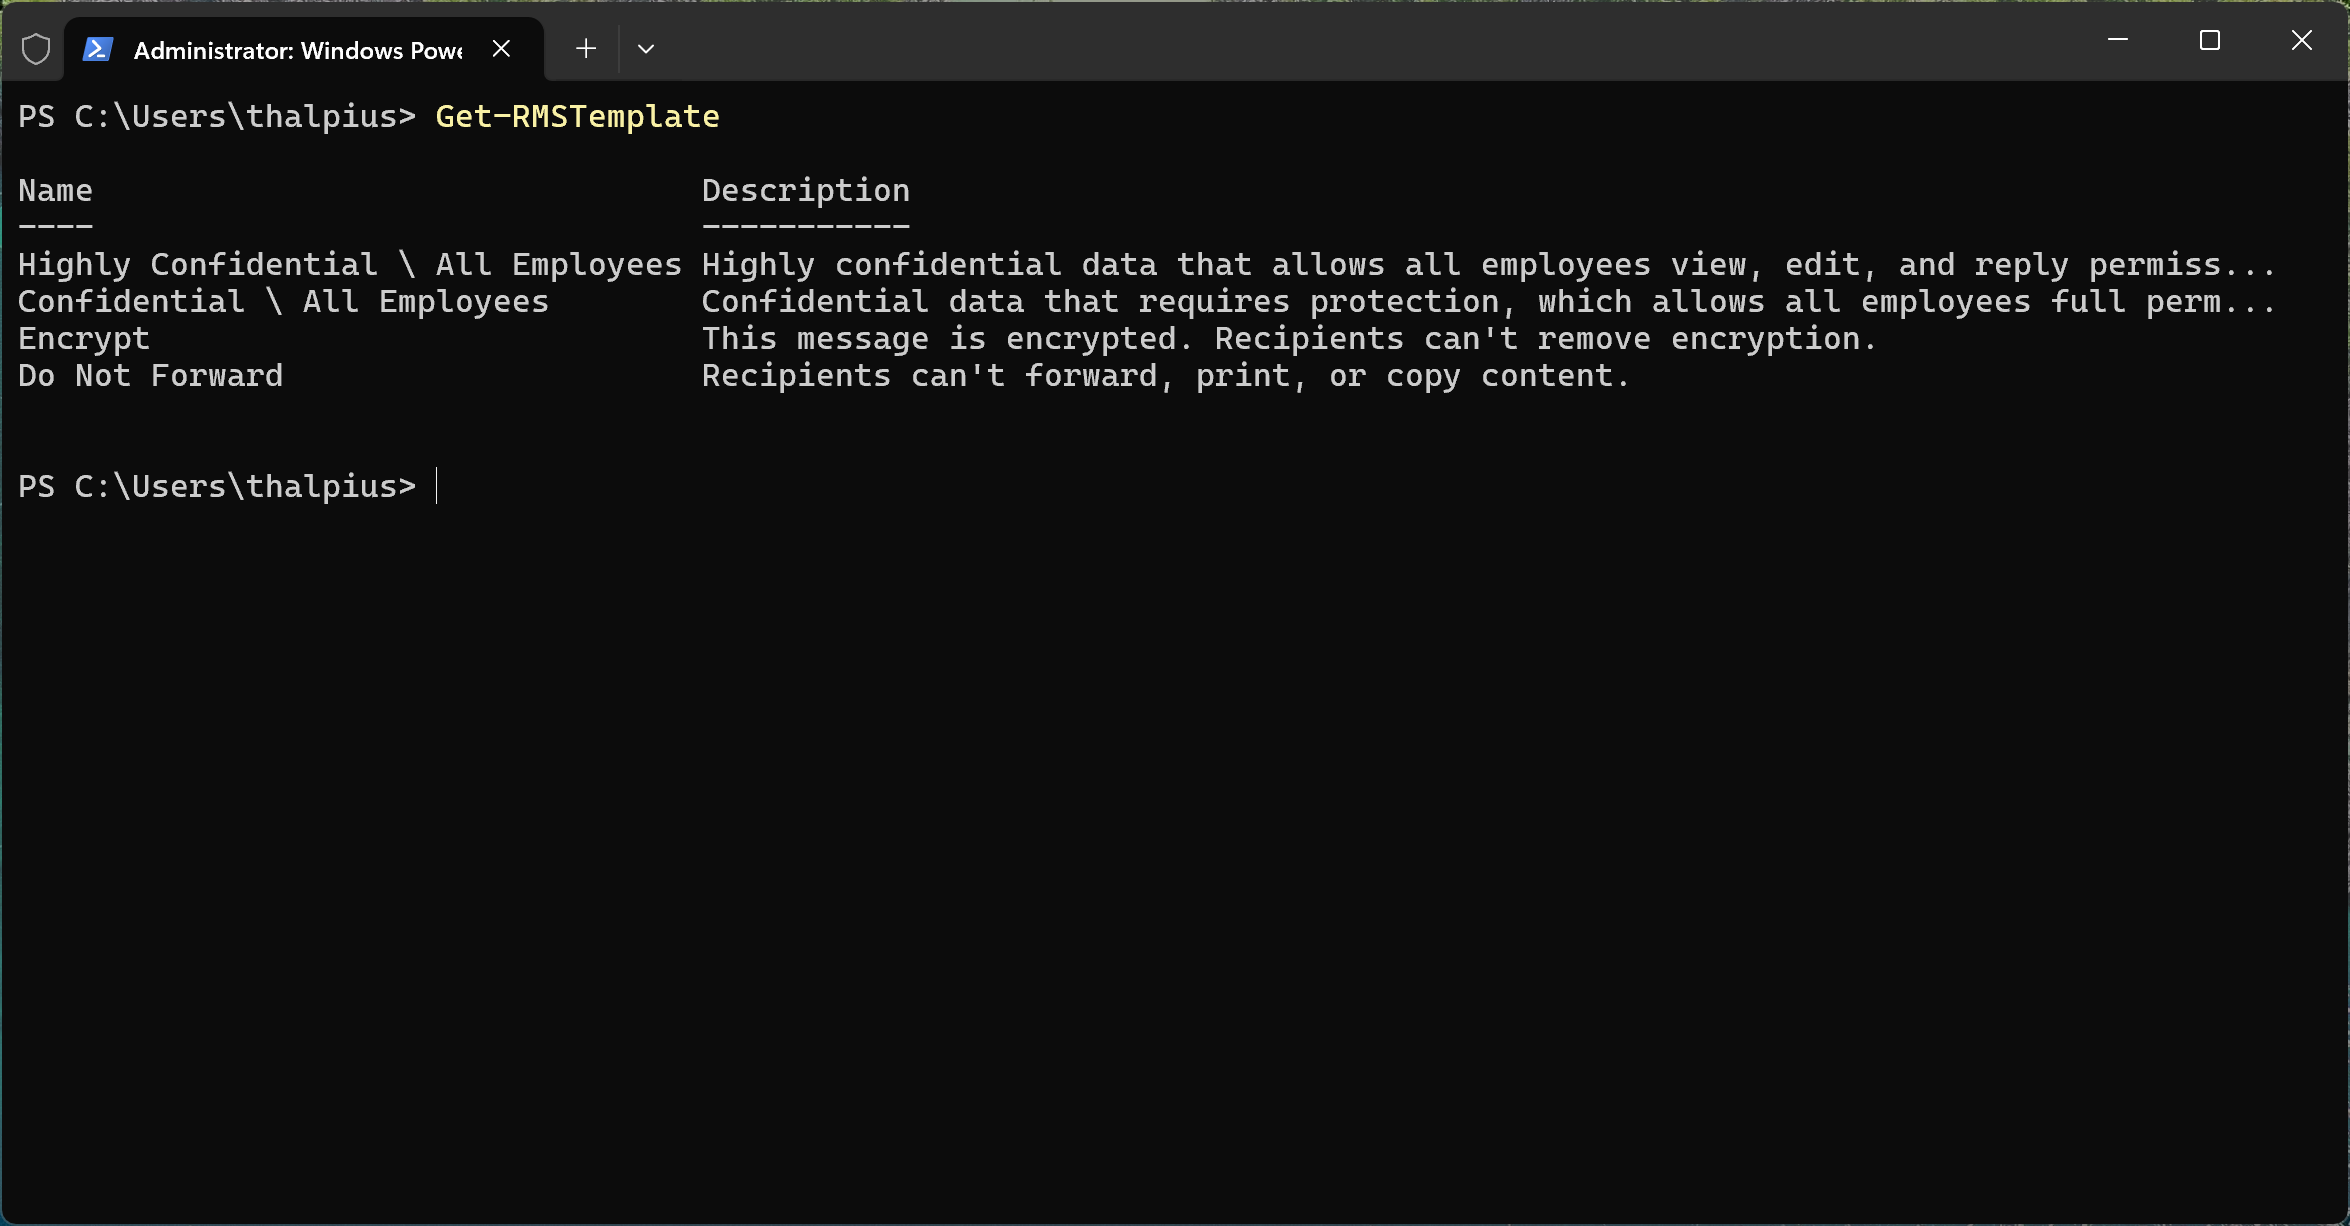
This is where it is easy to get stuck: InternalLicensingEnabled = True only confirms that Exchange is allowed to use IRM. It does not confirm that the underlying Azure Rights Management service is active. Running Get-RMSTemplate and getting nothing back, not even the default Encrypt and Do Not Forward templates, means Rights Management itself is disabled tenant-wide. That is fixed through a separate module:
Install-Module -Name AIPServiceConnect-AipServiceGet-AipServiceEnable-AipService
Once enabled, Get-RMSTemplate returns the default templates plus any custom ones created afterward.
If expiration or revocation is needed, a custom branding template can be created with:
New-OMEConfiguration -Identity "BSN-Template" -ExternalMailExpiryInDays 7
If a custom branding template is needed later, for example to enable expiration or revocation, it is worth knowing that it does not appear as a protection option in the same dropdown as Encrypt and Do Not Forward. It requires a second, separate DLP action called Apply branding to encrypted messages, added alongside the encryption action rather than instead of it.
Building the DLP Policy
In the Microsoft Purview compliance portal, under Data loss prevention, Policies, a custom policy scoped to Exchange email needs the following:
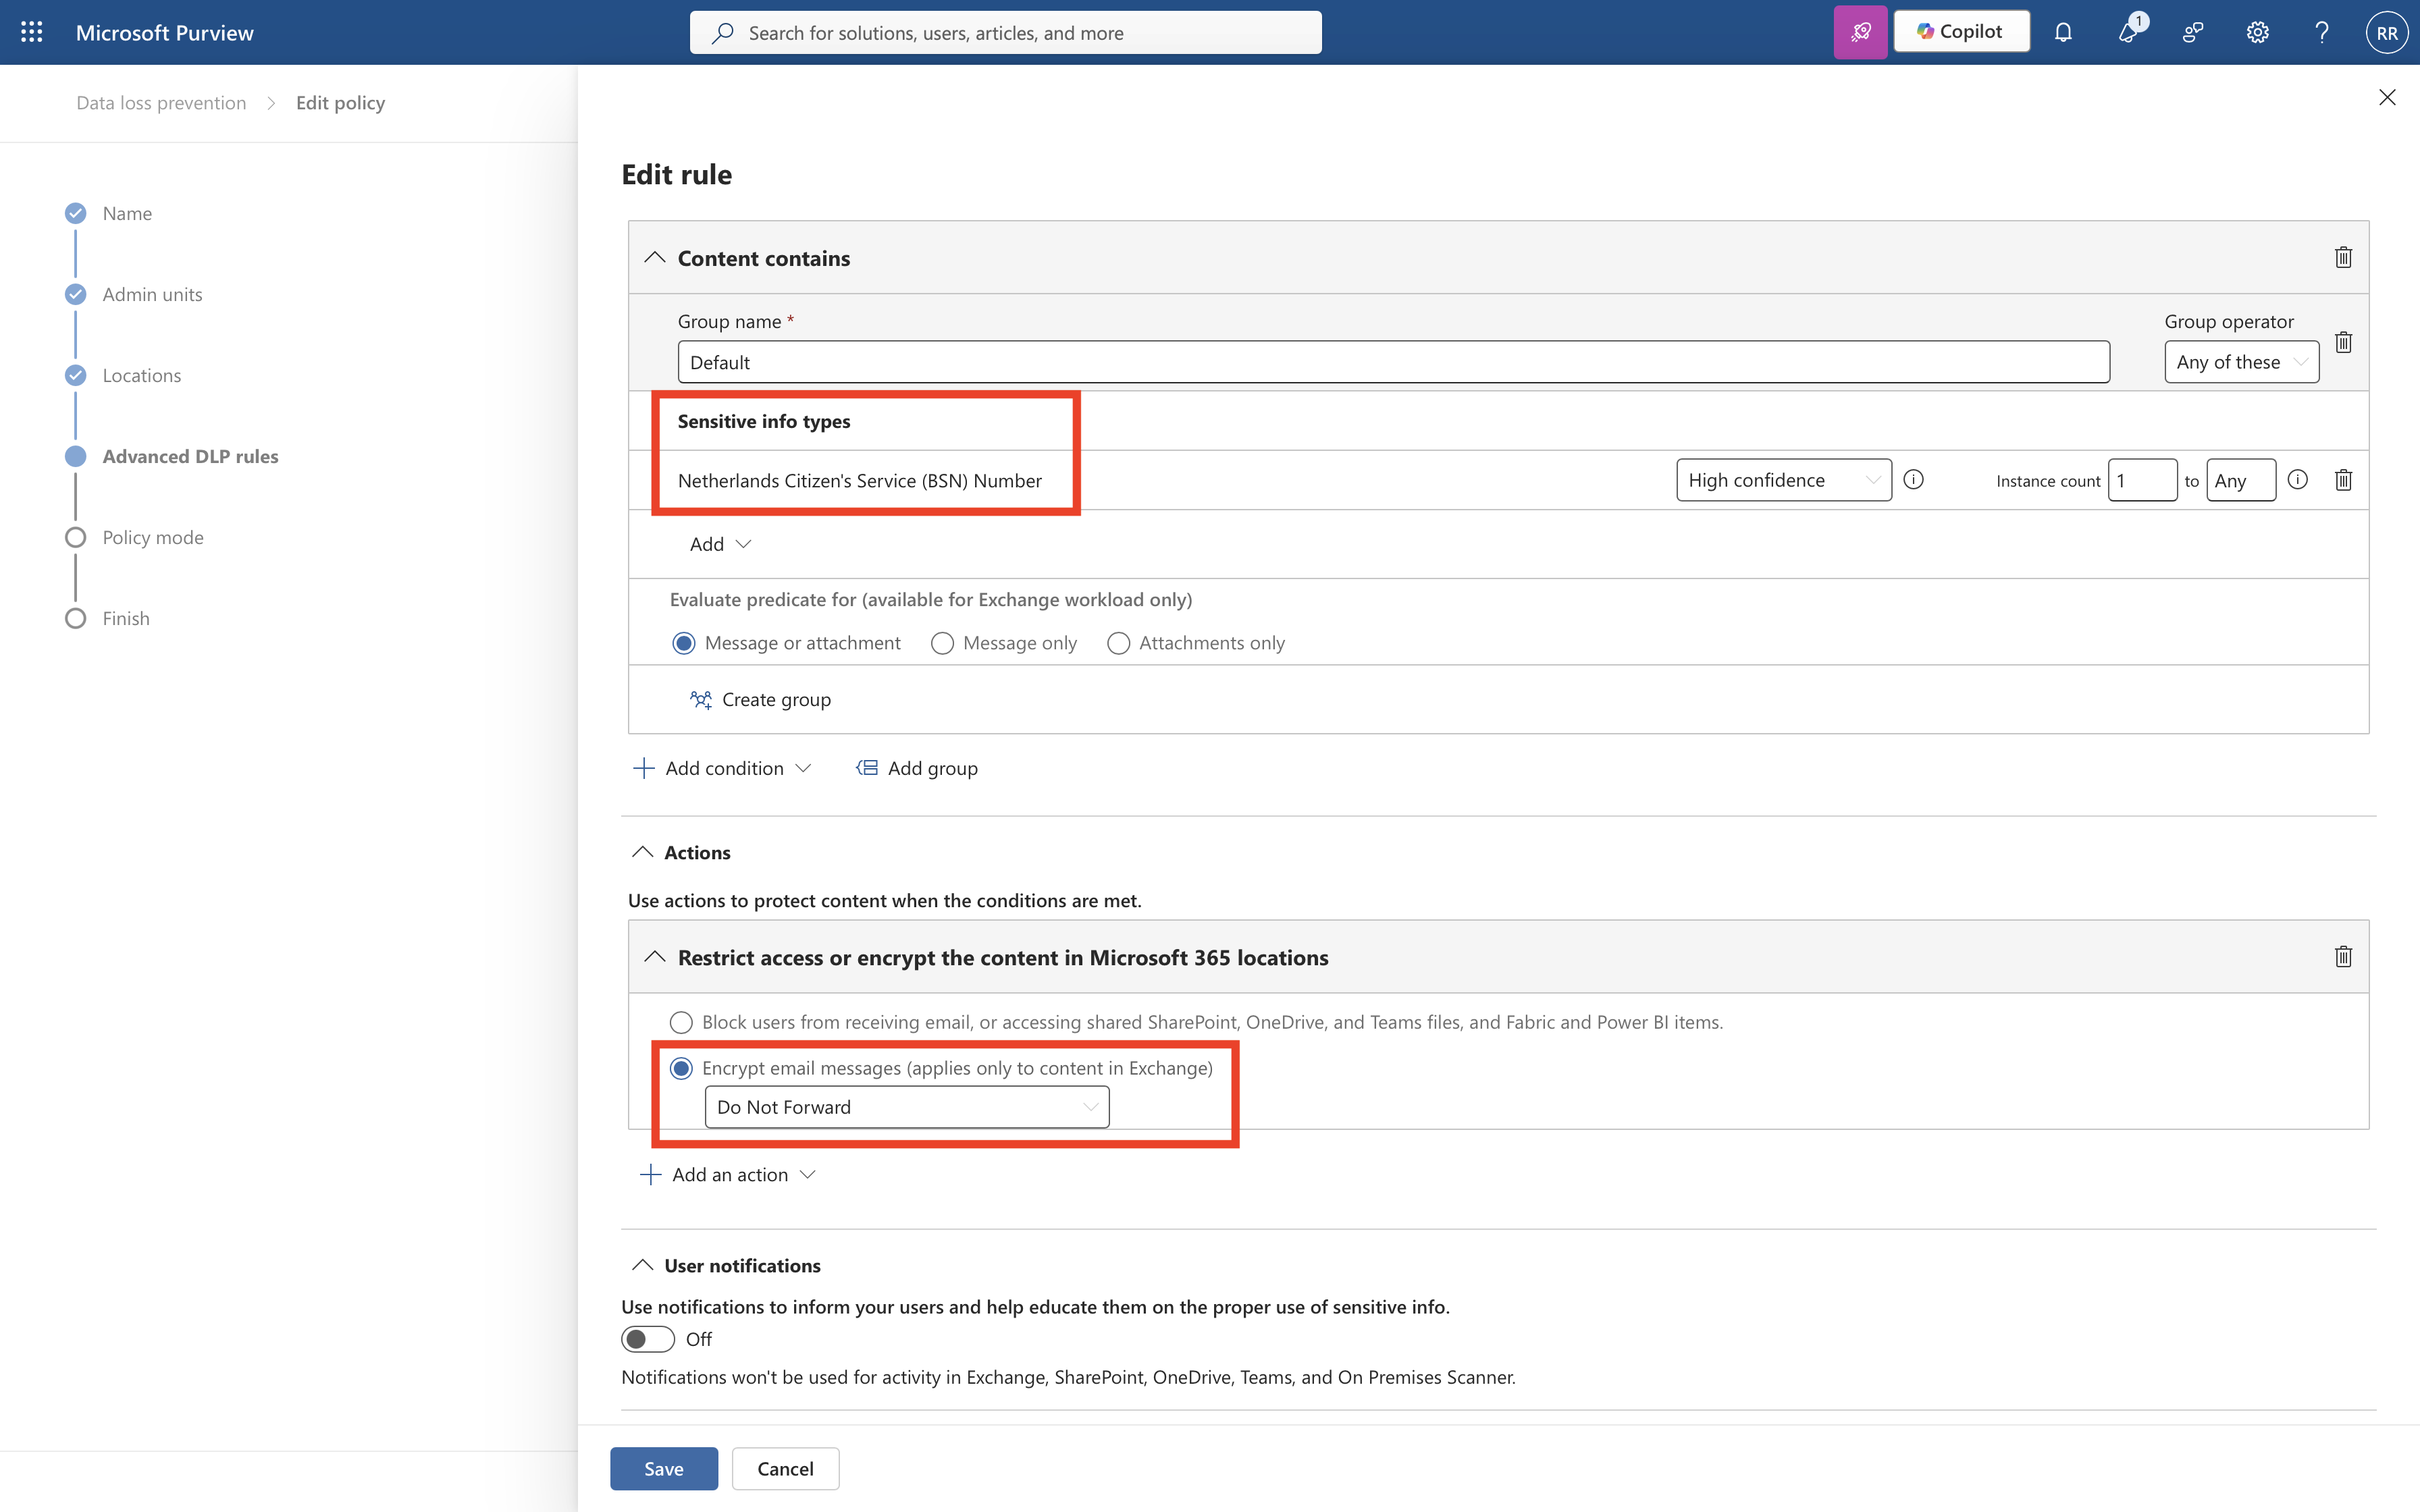
- Condition: content contains sensitive info type, Netherlands Citizen’s Service (BSN) Number
- Action 1: Restrict access or encrypt the content in Microsoft 365 locations, Encrypt email messages, Do Not Forward
- Action 2 (optional): Apply branding to encrypted messages, selecting the custom template
Naming both the policy and the rule descriptively pays off later, once there are several DLP policies running. Something like Encrypt Email - NL BSN Detection for the policy and Encrypt with DNF - NL BSN Detected for the rule is enough to trace a match back to its source in Activity Explorer without guessing.
Starting the policy in test mode with notifications, rather than full enforcement, logs every match, including the sensitive info type, policy, rule, and action that would have been taken, without actually encrypting anything yet.
Testing the Detection
A few details matter before sending a test email:
- DLP only scans new outgoing mail. Nothing already sent gets scanned retroactively, and a newly enabled or changed policy typically takes about an hour to fully propagate.
- A fake but checksum-valid BSN is enough for testing. The number 111222333 passes the BSN checksum (the elfproef: multiply each digit by weights 9, 8, 7, 6, 5, 4, 3, 2, -1, sum the results, and the total must be divisible by 11) without belonging to a real person. On its own it may not trigger detection though; the sensitive info type also looks for a nearby keyword such as “BSN” within roughly 300 characters, so pairing both in the test email is what reliably triggers a match.
- Activity Explorer, not Content Explorer, shows rule matches. Content Explorer reports where sensitive content exists across the environment; Activity Explorer confirms whether a specific email actually matched a DLP rule, using the filter “DLP policy rules that detected activities.”
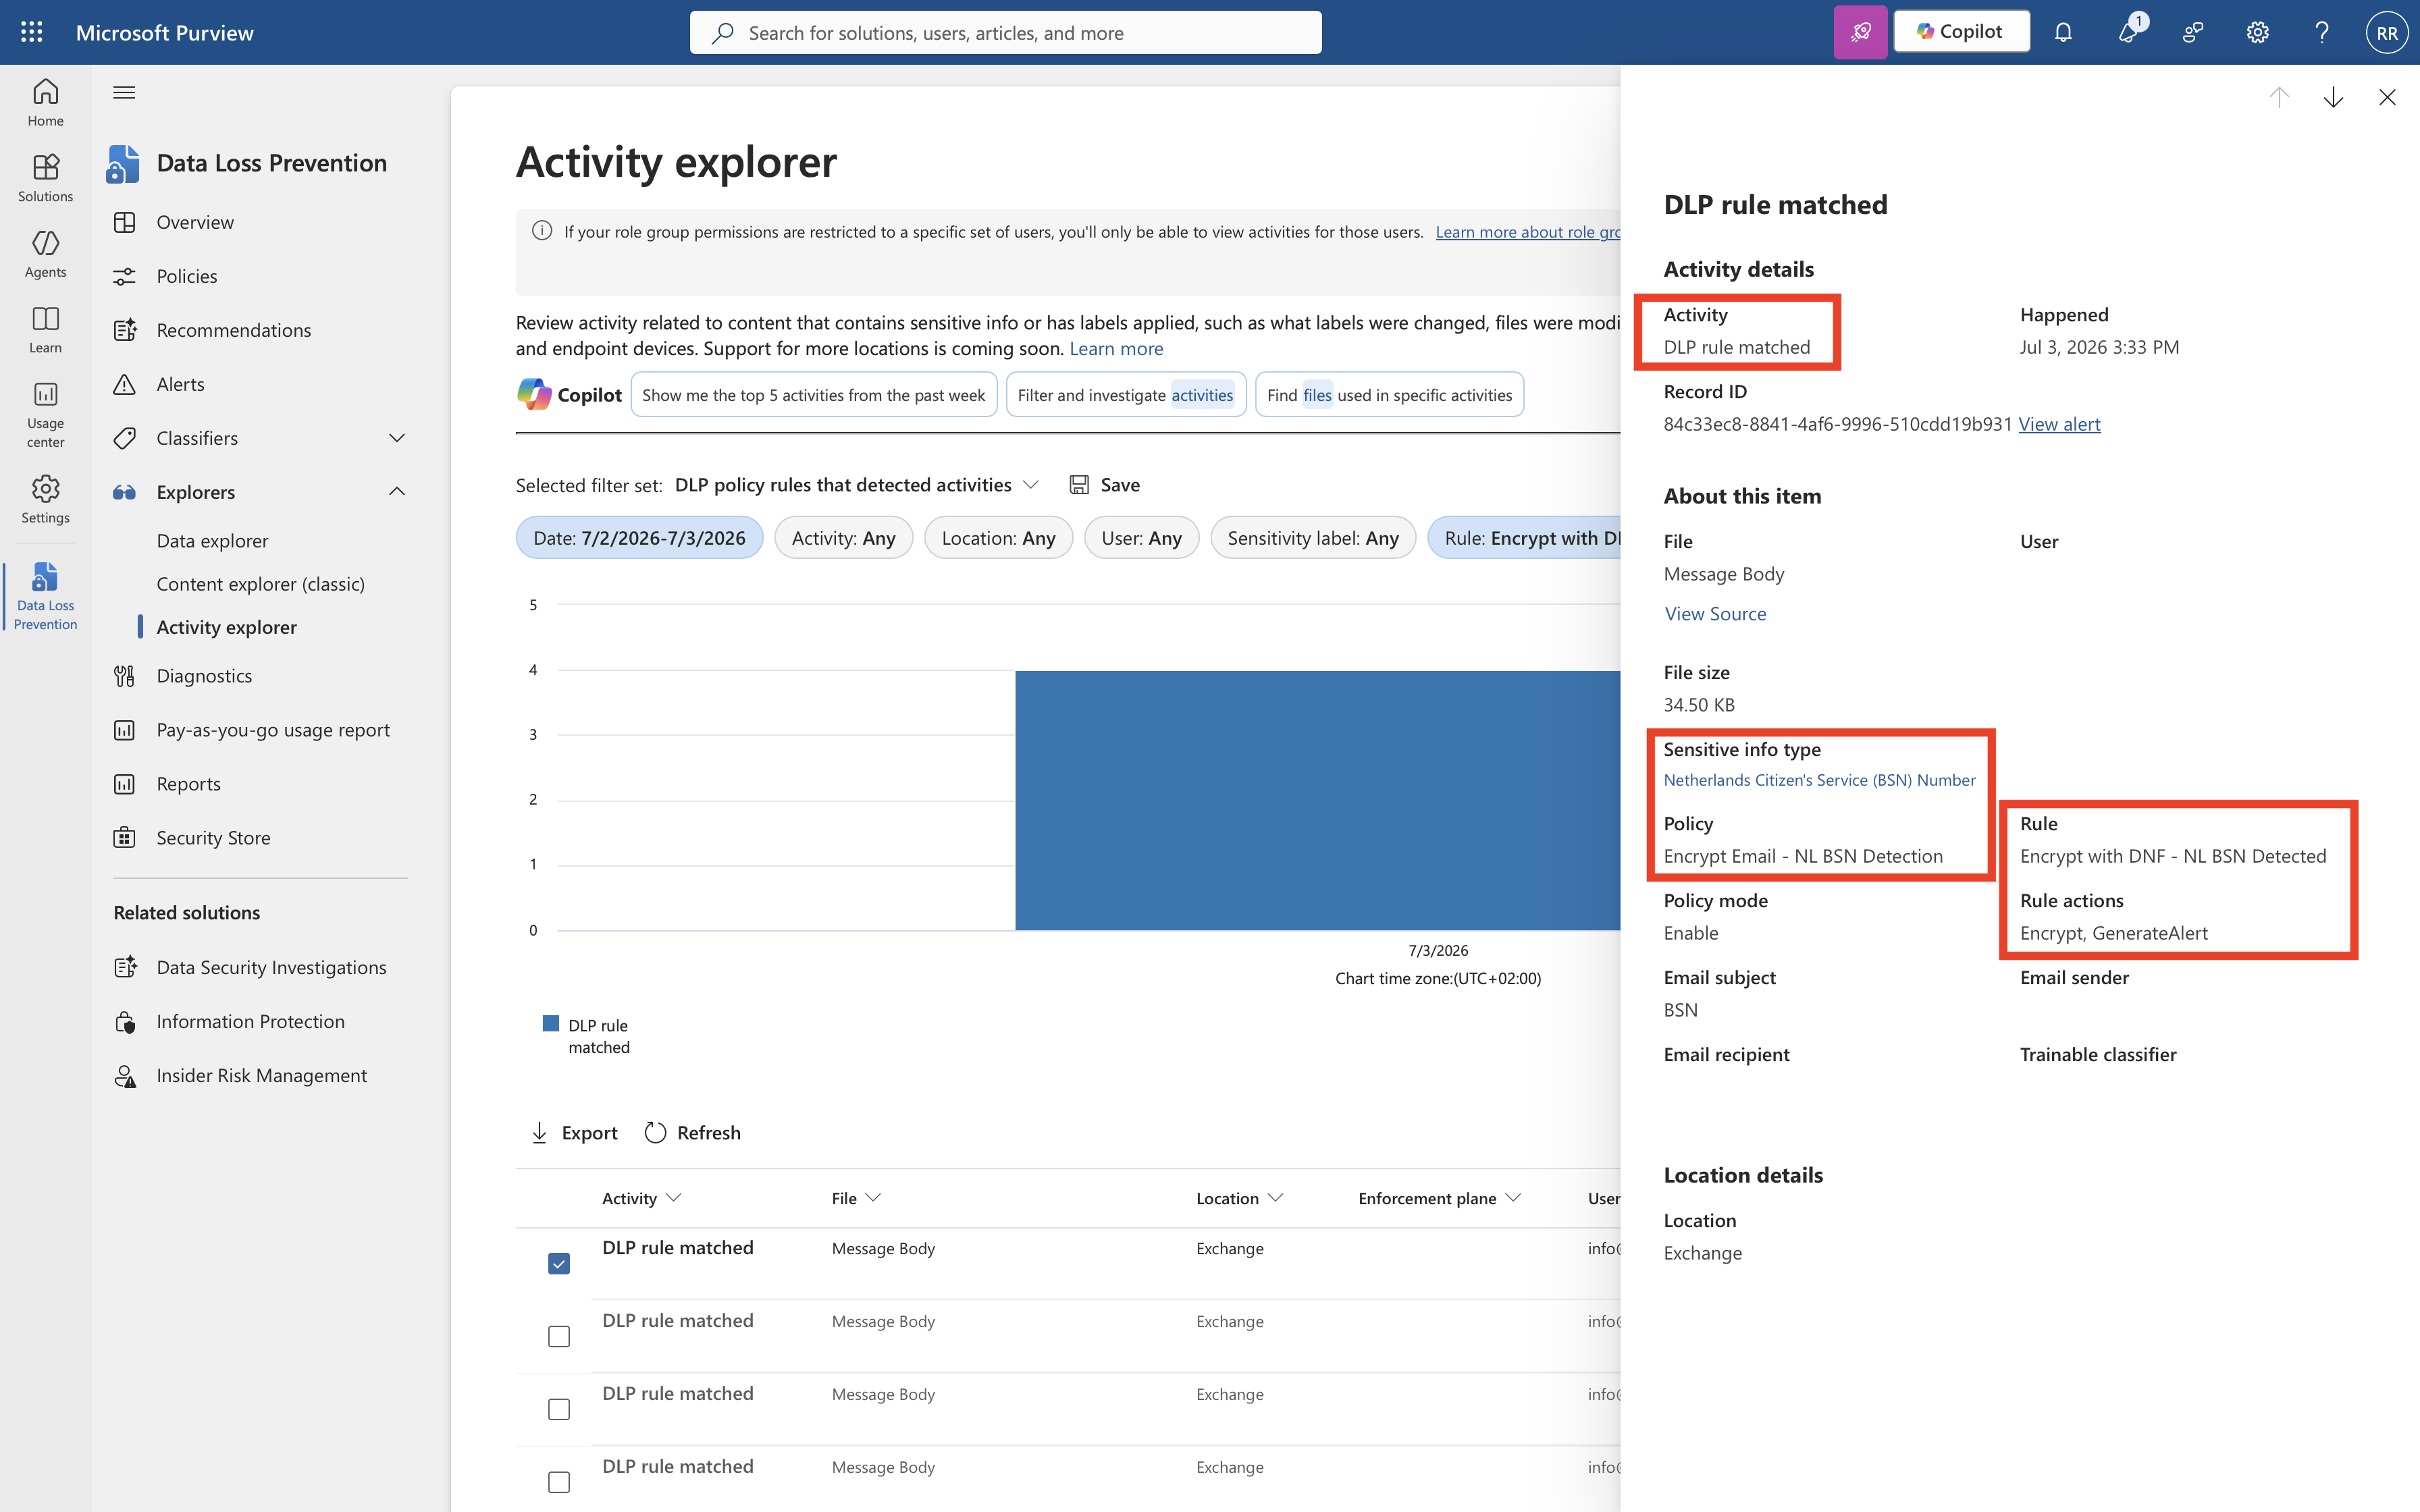
Once a “DLP rule matched” event shows the correct sensitive info type, policy, and rule name, the policy can move from test mode to enforce. After another hour of propagation, a genuinely fresh test email confirms the real behavior.
What the Recipient Actually Sees
Sending the same encrypted, Do Not Forward email to different types of recipients produces two distinct experiences:
- A Microsoft account recipient (Outlook.com, Hotmail, or a Microsoft 365 mailbox) gets a native experience. The message opens normally, with only a small “Do Not Forward” label at the top, no login prompt or portal. Decryption happens transparently because the recipient is already signed in with Microsoft; the restriction itself, blocking forwarding, is still fully enforced.
- A non-Microsoft recipient (tested with Gmail and iCloud) gets the classic wrapped portal experience: an email with a “Read the message” link, requiring identity verification through a one-time passcode or a Microsoft sign-in before the content becomes visible.
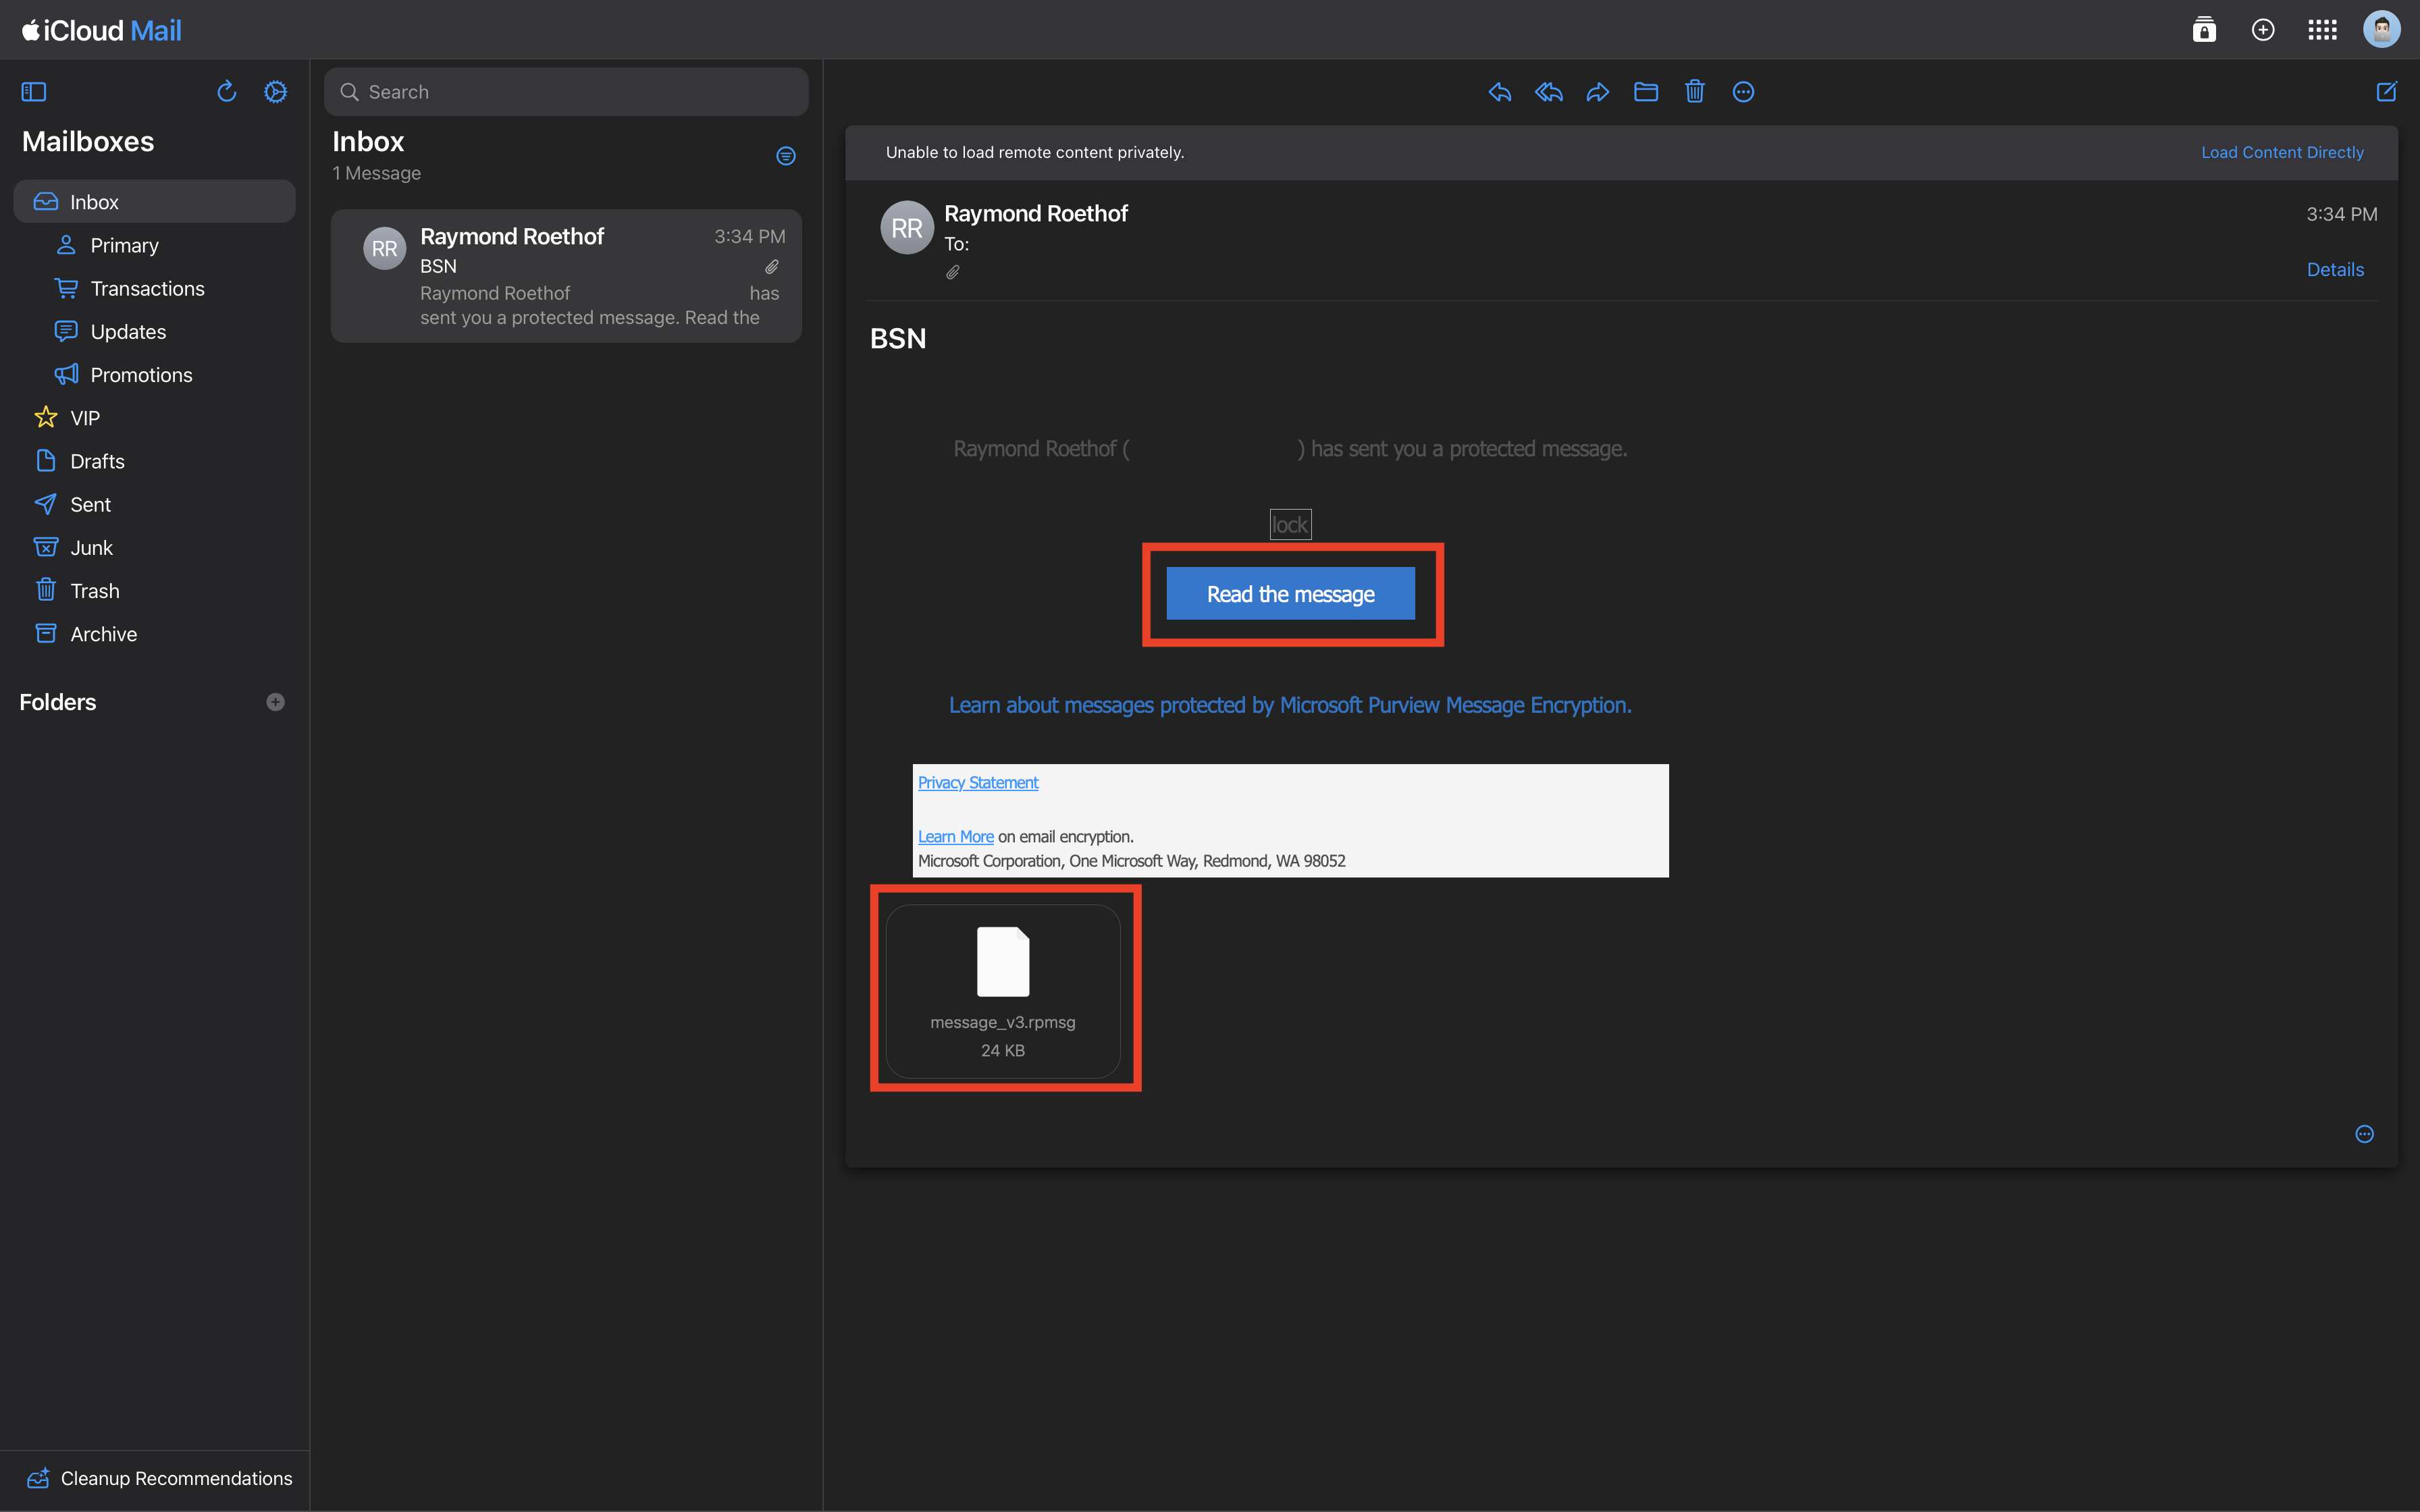
Both are the exact same underlying protection. The difference is only in how Microsoft verifies who is opening the message, which is worth knowing before assuming that a smooth, login-free reading experience means something was not encrypted.
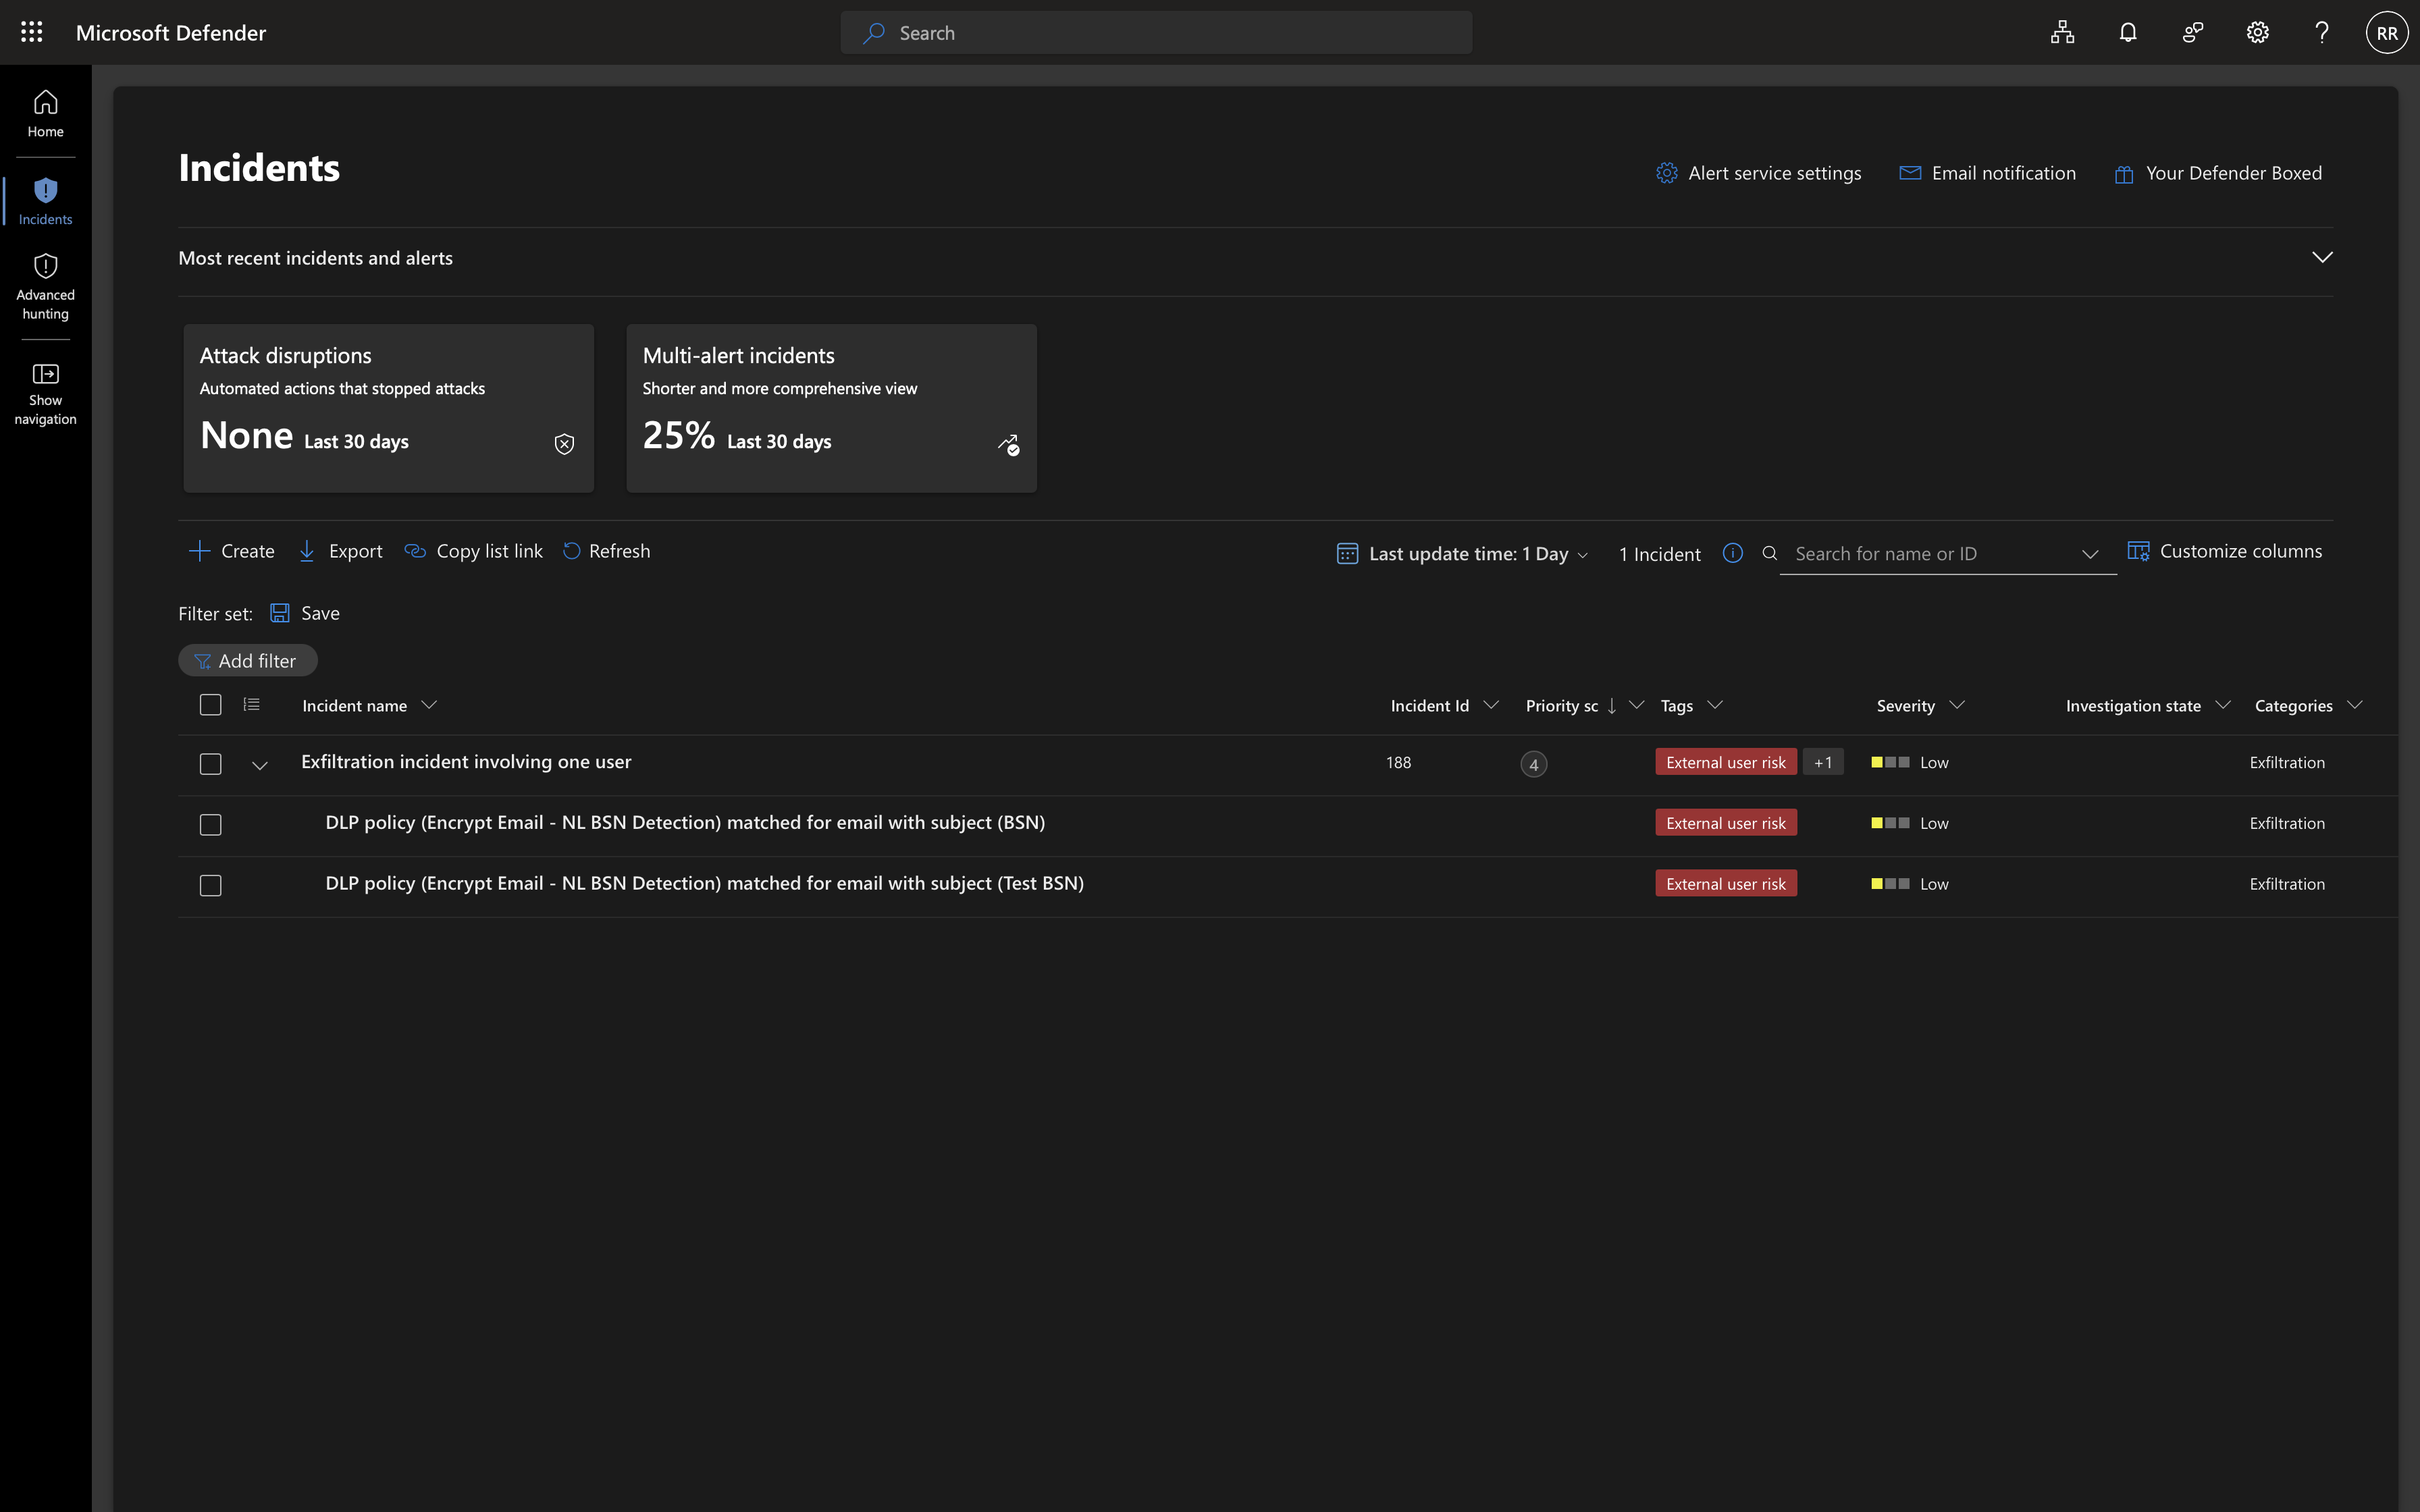
It Still Shows Up as an Incident in Defender
Encrypting the message does not make the action invisible to security monitoring. Because the email still left the organization to an external recipient, Microsoft Defender correlated the DLP match into an incident tagged “External user risk” under the Exfiltration category, at Low severity. The data itself stayed protected, but the event was still flagged for a SOC team to review if needed, a reminder that Purview and Defender are complementary layers, not substitutes for each other.
Conclusion
- Classification drives everything: without a sensitive information type detecting the BSN, there is nothing for a DLP action to encrypt in the first place.
- Do Not Forward, not Encrypt plus Do Not Forward: the two are alternatives, not additive actions, and Do Not Forward already includes the encryption.
- Test mode before enforce: confirming a detection match in Activity Explorer first avoids surprises once the policy actually starts encrypting live mail.
- The recipient experience varies, the protection does not: a native, login-free read for Microsoft account holders and a portal-based read for everyone else are the same encryption underneath.
Given how safely this can be tested, a made-up but checksum-valid number sent to your own test mailboxes, there is little reason not to set this up before something sensitive slips through in plain text.
